Page 2 of 70
Re: [Miniatures] Painting tips and progress reports (with pi
Posted: Sun Sep 16, 2012 8:51 pm
by dbt1949
In my earlier days I painted a ton of miniatures. Mainly historical, probably over 25,000. 95% of them metal. Even made my own from molds. Metal never seemed to have the detail that plastic has but stood up better to handling. I was never in the class of you guys tho.
One interesting project I made one time that turned out well was building a frontier fort out of the long fireplace matches. Cut off the match heads, sharpen the tops and then glue long matchsticks along the back as braces to make the walls. Make kind of a smaller version for the rampart platform and pretty much using the same technique make the blockhouses. Used them mainly for French & Indian and Revolutionary wars.
I was in the process of casting and painting Middle Earth armies when I lost my steadiness. I still love seeing pictures of painted figurines tho.
Re: [Miniatures] Painting tips and progress reports (with pi
Posted: Sun Sep 16, 2012 11:04 pm
by YellowKing
Since I don't have any minis to show off (yet), I thought I'd post some pics of larger figures I've done just to give an example of my painting level. This first one may have been posted before on OO.
This is a Schlitzie the Pinhead resin kit I made for my brother. He is HUGE into carnivals, freak shows, etc. Loves everything about the old sideshow days. This character is from the movie "Freaks" and was a real person. I took some creative liberties with his dress - since it was a plain smock, I decided to dress it up with a flower pattern.
What you see here is not *quite* the finished product. Before I gave it to my brother I touched it up a bit and added a little more shading. I added a miniature silk flower in his hand. I also put a miniature poster of "Freaks" on the base and put it in a glass dome. To this day he tells me it's the best Christmas present he's ever received.


When I can dig up the pics, I'll try to post some of the Mummy and Nosferatu busts I've done.
Re: [Miniatures] Painting tips and progress reports (with pi
Posted: Mon Sep 17, 2012 12:39 pm
by Blackhawk
Ok, Boneflayer is prepped, and we have a general idea of what we want to do (the hyena and gnoll references.) Next, I generally plan how I'll approach painting the piece.
Anyway, recycling the original image of Boneflayer:
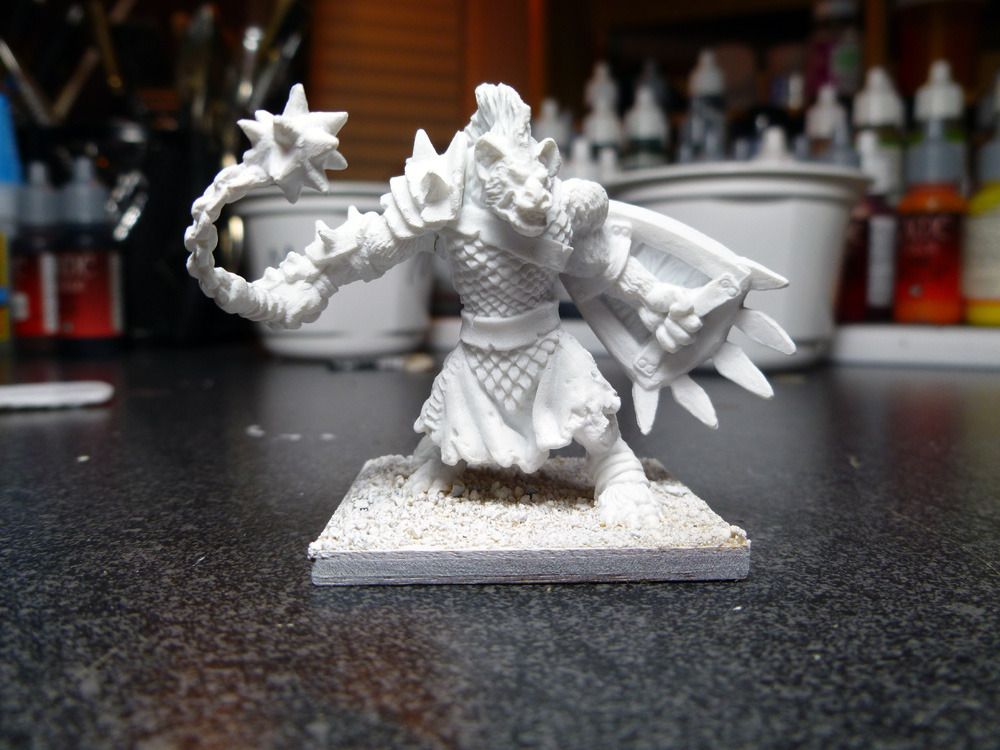
(Humph - need to do more work on that mold line across the back of his arm.)
Now look at him. He has a cloth skirt, scale armor over his torso, a shield, a wide belt, a flail, and plate armor on his right arm (why do they always do that - if you wear extra armor on one arm/shoulder, you put it on your off side, where the blows generally come from, not on the arm that is typically held away.) Sorry, anyway.
I know that his fur is going to run from cream through yellows into near orange tones. I want to plan the rest of him with that in mind.
His weapon doesn't matter, at least for now, as it is a fairly simple flail and not a focus of the miniature.
His armor I'll likely make a dark metallic silver (I despise NMM - more on that later.) I could go with a gold or bronze armor, but he's already going to be yellow-orange, and I think going with the same color on the armor would make him look like a yellow blob on the table. That said, he's a gnoll, not a paladin. His armor will be dark, maybe even a bit oxidized, rather than shiny. The plate on his arm will likely be the same, but a tad darker.
On to his skirt. The miniature, while having yellows and oranges, isn't going to be particularly colorful. His fur will be dingy rather than bright. I need a little bit of color. Blue would clash with the yellow-orange. Red wouldn't stand out. Green will contrast nicely, add color and enhance contrast. It will have to be a dark green, though, as a medium or light green would look sickly with the yellows.
The straps cross both his armor (silver) and his fur (the armor only covers the front.) I will likely make them black. I steer away from black straps most of the time, but but a tan leather would look bad over the armor, and a darker brown would disappear into the fur. Actually, I may experiment with a very dark brown on this - if I can get a color that is halfway between his fur and his mane, it will stand out. Note: Make the mane dark.
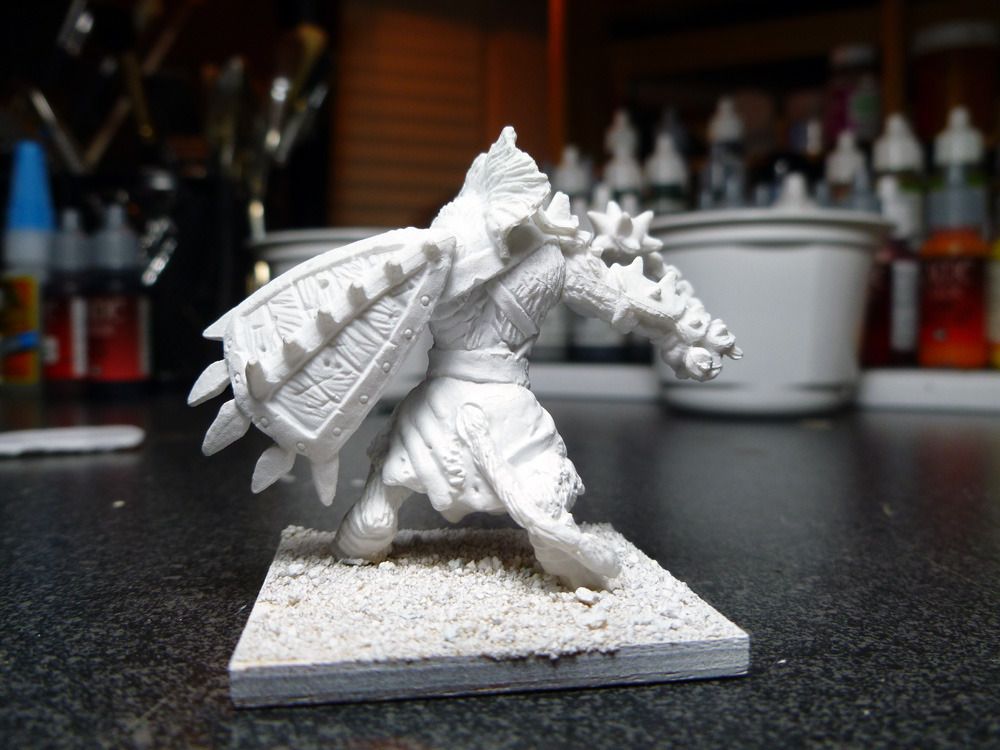
That leaves the shield. It is wood with metallic banding and spikes. The wood needs to be medium to dark to contrast with the fur. The metal will be iron, likely painted black with a light metallic element and some brighter metallic showing through as scrapes and nicks.
Ok, now I have a general idea of how I want to approach Boneflayer. It is of course, a very malleable plan. If the fur ends up looking different from what I'm expecting, I might very well change some of the other details. If the green looks like crap when I start to paint it on, I'll just change it. It helps, though, to have some idea of how you're going to approach a piece before you start.
Now, this probably all seems complicated, but it that's only because I'm sitting here codifying it. In practice, I usually just search for a few images, stare at the miniature and give it a moments thought before beginning. Writing out the thought process makes it seem excessive, when it is really only a minute's head scratching in practice.
Anyway. That's our plan. Next is deciding what to paint next. The wood on the shield will be first. That's only because it crosses the arm on the inside, and I don't want to mess up the arm trying to paint the shield around it.
After that is the fur. You generally want to paint from the bottom up, the same way you would when you're getting dressed - skin, then lower layers, then outer layers, then accessories. The reason is that you don't want to have to try and paint
under something that has already been completed. For instance, it will be much easier to paint the straps on top of the fur than it would be to paint the fur without messing up already painted straps. By painting the fur first, I can get paint and ink on the straps, on the armor, on the skirt, whatever, then cover it over when the time comes.
Skirt is second. It was either that or the armor. The skirt will require more shading and highlighting than the armor, which means that it will be easier to avoid messing up the finished skirt when painting the armor than the other way around. Make sense?
So, shield wood, fur, skirt, armor. After that will come the details.
Again, this is normally all background thought processes rather than detailed plans, but it is the process I'm trying to demonstrate.
Re: [Miniatures] Painting tips and progress reports (with pi
Posted: Mon Sep 17, 2012 2:33 pm
by Zarathud
I failed painting wooden cubes orange this weekend, and placed a meeple order instead.
I did discover my paintbrushes, tools and box of unpainted sci-fi dudes. My GW paints are all dried out, but the few Reaper bottles seemed ok.
Re: [Miniatures] Painting tips and progress reports (with pi
Posted: Mon Sep 17, 2012 2:41 pm
by Isgrimnur
Zarathud wrote:I failed painting wooden cubes orange this weekend, and placed a meeple order instead.

I would like to know more.
Re: [Miniatures] Painting tips and progress reports (with pi
Posted: Mon Sep 17, 2012 3:08 pm
by TiLT
Sorry I didn't update this weekend. I've been having a cold and rather wanted to sit back on the couch with a game than paint minis and post my progress.

I didn't paint any new minis today, but I did touch up the ones I've shown before. For the regular walkers I did some light dry brushing (didn't turn out quite the way I expected. Maybe the Reaper paint series I'm using doesn't work very well for that purpose) to brighten them up a bit and make their colors more distinct. It was a mixed success. I also painted their ties (one purple, two crimson red). Finally, I painted all the minis' eyes with ivory white for that zombie glow effect, which was also a mixed success. Painting fine detail is
hard.
When that bit of paint had dried, which went by quickly, I sprayed all the minis
briefly (and I do mean briefly. They should barely be touched by the spray before you're done) with matte varnish to remove that glossy look from the quickshade and strengthen the paint a bit against abuse. That reminds me of an added bonus from quickshade, by the way. It doubles as a gloss varnish and will protect your paint from damage. Normally you'd have to apply gloss varnish separately.
I haven't touched the bases since I'm honestly not sure what to do with them. I've got several types of flock, including earth, grass, tufts and rocks, but I don't feel they work for these figures. After all, Zombicide takes place entirely within the confines of a city, with the majority of the time being spent on asphalt. I might just paint all the bases black and be done with it, but I'm going to need to receive my black paint first.
Here's the result:

Re: [Miniatures] Painting tips and progress reports (with pi
Posted: Mon Sep 17, 2012 3:47 pm
by silverjon
I like how they've turned out, to my uneducated eye.
TiLT wrote:Painting fine detail is hard.
Do you use a small brush for that? Would something stiff like a round wooden toothpick allow a greater degree of control over where your paint goes? Or flat toothpick, depending on what you're trying to achieve. Different shapes would apply paints differently... not too different from using stamping blocks, but tiny.
IRT making urban-look bases
I was thinking if you added some texture under the paint, they'd be more convincing. But what would be fine enough to be in scale? This guy recommends baby powder.
http://www.youtube.com/watch?v=sEbK8pXgvqQ" target="_blank (sculpt)
http://www.youtube.com/watch?v=EBEgZc8LRN4" target="_blank (paint)
Obviously your dudes are already attached to their bases, but there might be some ideas in there you could adapt. Looks pretty neat to me.
Re: [Miniatures] Painting tips and progress reports (with pi
Posted: Mon Sep 17, 2012 3:55 pm
by Isgrimnur

Steering wheel for my car. SG black on the center, flat black on the grips. Buttons, counterclockwise, are red, white, yellow, a sg black, interior green, sky blue (mixed from flat blue and blue MF) yellow, and orange, all done with a 2/0 brush. Lucky for me, the buttons are raised. I did overflow a couple of them onto the console, but I was able to use the hobby knife to remove the excess paint.
Re: [Miniatures] Painting tips and progress reports (with pi
Posted: Mon Sep 17, 2012 3:59 pm
by AWS260
I don't paint minis, but I really enjoy this thread.
Re: [Miniatures] Painting tips and progress reports (with pi
Posted: Mon Sep 17, 2012 6:11 pm
by Blackhawk
TiLT wrote:
I haven't touched the bases since I'm honestly not sure what to do with them. I've got several types of flock, including earth, grass, tufts and rocks, but I don't feel they work for these figures. After all, Zombicide takes place entirely within the confines of a city, with the majority of the time being spent on asphalt. I might just paint all the bases black and be done with it, but I'm going to need to receive my black paint first.
If I were painting them, I'd either paint them all black - the "don't pay any attention to me" base - or I'd do the sand treatment, but use a very fine, consistent sand (colored craft sands are available in many craft stores), paint it black, and drybrush with dark gray to give a quick asphalt look. With a coat of varnish over the base, it becomes very durable, as there are no parts sticking up to knock off.
Re: [Miniatures] Painting tips and progress reports (with pi
Posted: Mon Sep 17, 2012 10:21 pm
by Zarathud
Isgrimnur wrote:Zarathud wrote:I failed painting wooden cubes orange this weekend, and placed a meeple order instead.
I would like to know more.
The mixed set of 8mm wooden cubes I picked up at GenCon for my
Avalon Hill Dune didn't include Orange or Yellow. So I figured on painting some of the extra Purple cubes Orange. After trying to paint the first side, I realized my old paints were spreading unevenly and thinning the paint just made the coat more uneven when I continued doing the second and third sides. And I was painting my fingertips, which the kids thought was hillarious.

Luckily, the
Meeple Source came out recently with a meeple set for
Lords of Waterdeep, so adding a few extra cubes to the order solved the problem. My order should arrive by mid-week.
Re: [Miniatures] Painting tips and progress reports (with pi
Posted: Mon Sep 17, 2012 11:52 pm
by Isgrimnur
Thanks for the story.

Re: [Miniatures] Painting tips and progress reports (with pi
Posted: Tue Sep 18, 2012 2:25 am
by TiLT
Blackhawk wrote:TiLT wrote:
I haven't touched the bases since I'm honestly not sure what to do with them. I've got several types of flock, including earth, grass, tufts and rocks, but I don't feel they work for these figures. After all, Zombicide takes place entirely within the confines of a city, with the majority of the time being spent on asphalt. I might just paint all the bases black and be done with it, but I'm going to need to receive my black paint first.
If I were painting them, I'd either paint them all black - the "don't pay any attention to me" base - or I'd do the sand treatment, but use a very fine, consistent sand (colored craft sands are available in many craft stores), paint it black, and drybrush with dark gray to give a quick asphalt look. With a coat of varnish over the base, it becomes very durable, as there are no parts sticking up to knock off.
I guess it'll be the black base then. The alternative, while it sounds good, would be too much work for a boardgame like this.
Re: [Miniatures] Painting tips and progress reports (with pi
Posted: Tue Sep 18, 2012 9:46 am
by raydude
Zarathud wrote:Isgrimnur wrote:Zarathud wrote:I failed painting wooden cubes orange this weekend, and placed a meeple order instead.
I would like to know more.
The mixed set of 8mm wooden cubes I picked up at GenCon for my
Avalon Hill Dune didn't include Orange or Yellow. So I figured on painting some of the extra Purple cubes Orange. After trying to paint the first side, I realized my old paints were spreading unevenly and thinning the paint just made the coat more uneven when I continued doing the second and third sides. And I was painting my fingertips, which the kids thought was hillarious.
Minor off-topic post. Apologies in advance. I promise I won't do this often, especially since this thread is cool.
So do you have a copy of AH Dune or did you DIY it? I could not afford the ebay prices so I downloaded some of the files off boardgamegeek, printed my own large size vinyl map and made my own deck, counters, player folders, and game wheels. I actually just recently found them sitting in my Tide of Iron box.
Re: [Miniatures] Painting tips and progress reports (with pi
Posted: Tue Sep 18, 2012 10:26 am
by Isgrimnur
TiLT wrote:Blackhawk wrote:TiLT wrote:
I haven't touched the bases since I'm honestly not sure what to do with them. I've got several types of flock, including earth, grass, tufts and rocks, but I don't feel they work for these figures. After all, Zombicide takes place entirely within the confines of a city, with the majority of the time being spent on asphalt. I might just paint all the bases black and be done with it, but I'm going to need to receive my black paint first.
If I were painting them, I'd either paint them all black - the "don't pay any attention to me" base - or I'd do the sand treatment, but use a very fine, consistent sand (colored craft sands are available in many craft stores), paint it black, and drybrush with dark gray to give a quick asphalt look. With a coat of varnish over the base, it becomes very durable, as there are no parts sticking up to knock off.
I guess it'll be the black base then. The alternative, while it sounds good, would be too much work for a boardgame like this.
Looking at a
GIS for asphalt, there's some white highlights in there. Also, you could spruce it up with the odd white or yellow paint line running through it.
Re: [Miniatures] Painting tips and progress reports (with pi
Posted: Tue Sep 18, 2012 10:30 am
by Blackhawk
Actually, that gives me an idea for an experiment: Layer of glue, cover in black pepper. I may try that on a modern piece sometime.
Re: [Miniatures] Painting tips and progress reports (with pi
Posted: Tue Sep 18, 2012 10:33 am
by Isgrimnur
I would say you're not too far off.

Re: [Miniatures] Painting tips and progress reports (with pi
Posted: Tue Sep 18, 2012 10:55 am
by Isgrimnur
I made the mistake of liking
Squadron on Facebook. One of the first things I see is them announcing Mystery deals. The first deal I saw is the T-6A Texan II, which is the newest trainer in the USAF and being used at my Dad's base to train
Euro-NATO pilots. I ordered two of them. The only problem is that it didn't come with decals for his base, so I may need to try and hand-paint the tail markings.
Re: [Miniatures] Painting tips and progress reports (with pi
Posted: Tue Sep 18, 2012 10:15 pm
by Zarathud
raydude wrote:So do you have a copy of AH Dune or did you DIY it? I could not afford the ebay prices so I downloaded some of the files off boardgamegeek, printed my own large size vinyl map and made my own deck, counters, player folders, and game wheels. I actually just recently found them sitting in my Tide of Iron box.
My mom found my old AH Dune box and set it aside for me a few months before that closet in her house flooded. The box was missing two cards, two characters and all of the chits. I printed a set of Ilya DIY decks from Artscow, and picked up crystals for spice and 8mm cubes for armies.
Re: [Miniatures] Painting tips and progress reports (with pi
Posted: Wed Sep 19, 2012 3:39 pm
by Isgrimnur
I found an interesting little utility:
Scale Model DB paint matcher. Apparently, USAF Blue is not a color that the paint manufacturers er, manufacture. By putting in the
hex code from Wiki, I was able to determine that Tamiya X-4 was about as close as I was going to get. It even gives me the color deltas. Now if I can just find a way to tweak it...
Re: [Miniatures] Painting tips and progress reports (with pi
Posted: Sat Sep 22, 2012 10:48 pm
by YellowKing
I'm laying down the base colors on my minotaur, so hopefully I'll have some pictures for you guys soon. Let me say that I LOVE the Reaper paints. Never again will I cheap out on paints - the difference really is night and day.
Re: [Miniatures] Painting tips and progress reports (with pi
Posted: Sat Sep 22, 2012 10:50 pm
by Blackhawk
I've been sick as hell the last few days, so I haven't wet a brush since the last post. Don't worry, more is on the way.
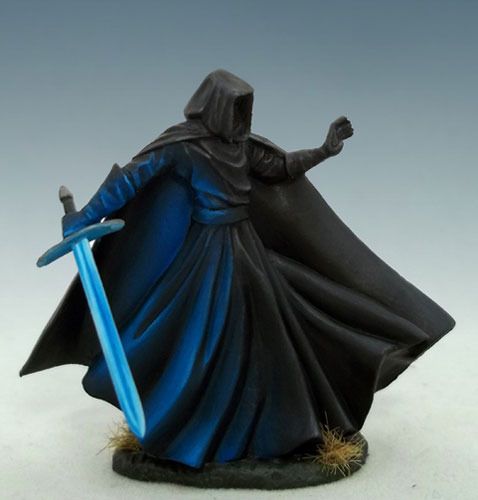
In the meantime, here's an admiration shot of a piece I've seen on CMON. Note that there is no actual glow to the sword - the artist has painted the highlights onto the miniature to simulate the effect. I've seen it done before with torches and such, but never on straight black.
Re: [Miniatures] Painting tips and progress reports (with pi
Posted: Sun Oct 07, 2012 10:57 am
by baelthazar
OK, I'm a total amateur but this thread delivers the goods and delivers hard. I think I might look into quickshade, as I have been just using a homemade dilution of brown and black as a wash but the result is fairly good, if uneven. I'm finding that my basecoat is hard to get to be an even shade, but the models I am working on are from A Touch of Evil and it gives them a sort of "vintage" look to have the uneven paint coats. I won't want this for other minis, like the Super Dungeon Explore guys and such. I also used a white primer, but bought a bottle of the spray black.
The one thing I wish I had NOT bought was the GW Purity Seal spray. Huge waste of money ($13) for a toxic product that fails to adequately protect the paint job. Now I am using a brush-on gloss varnish by Vallejo (hard to find, but I got the last bottle from Miniature Market) - which I put two coats - and then a quick spray of Testor's Dullcote. I actually don't mind the gloss finish and will probably stop there for the Super Dungeon Explore minis, given they are supposed to look like cartoons.
I am nowhere near being able to do proper highlights and details. I am also fairly slow, it takes me 2 hours to do one person. I'm using cheapy acrylic craft paints, but they work pretty well. I think I might invest in a case of Reaper paints or something a bit higher quality. I wish I could afford the KS Reaper minis and the paint set, but I just can justify spending 100+ on minis with my finances.
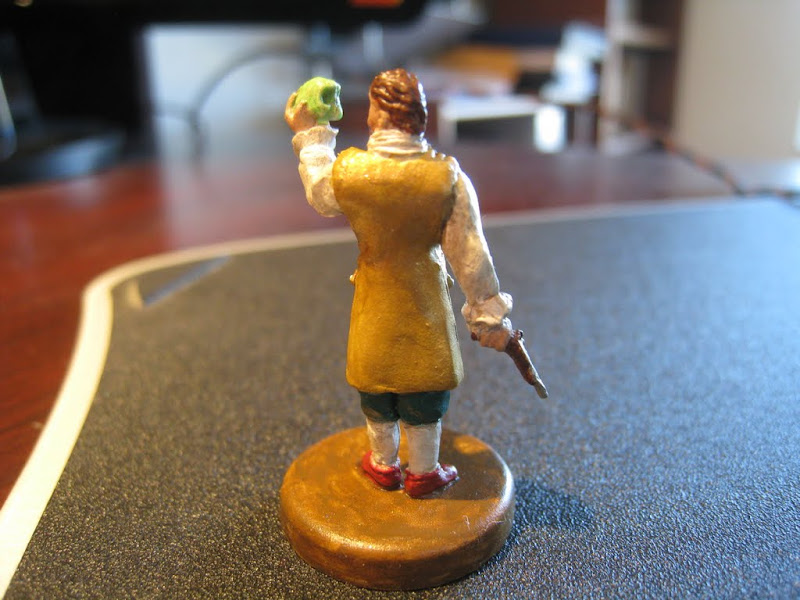
Here are some pics of my earliest work, again, I had NEVER painted a mini before this and it had been 20 years+ since I did models for 4-H, so I am pleased at how they turned out. The green skull is glow-in-the-dark paint, but the UV protection in the varnish prevent it from working...

NOTE: The scuplts have pretty bad faces, which have improved in the ATOE expansions. But some of the early scuplts look like stroke sufferers.


Re: [Miniatures] Painting tips and progress reports (with pi
Posted: Sun Oct 07, 2012 2:07 pm
by hentzau
That's really good work, Bael, especially for a first attempt at painting. I haven't put brush to figure in at least 5-10 years, and I'd be hard pressed to come close to that.
Re: [Miniatures] Painting tips and progress reports (with pi
Posted: Tue Oct 16, 2012 2:26 pm
by baelthazar
So I got my Reaper HD Core pack 1 today and I'm really excited to try it out. I also made a DIY Wet Palette that I am trying to learn how to use properly (but it is a lot better than using the dry palette if you have a lot to paint or paint slowly). After switching to a water and liquitex flow aid mix to dilute my paints, I'm seeing a marked improvement in streaking and visible brush strokes. Control is a little more difficult, but I think that is part of the learning curve of proper dilution.
Re: [Miniatures] Painting tips and progress reports (with pi
Posted: Thu Oct 18, 2012 2:32 pm
by baelthazar
Can I just say that there is a WORLD of difference between using Reaper paints and craft paints!
Do people here normally still dilute their Reaper paints, because they seem to go on well without dilution?
Re: [Miniatures] Painting tips and progress reports (with pi
Posted: Thu Oct 18, 2012 2:47 pm
by Blackhawk
It depends on the application and the color. For base coating, 1-1. For careful layering and building up of highlights, I dilute as much as 4-1. The dilution isn't just to make it liquid, it is to give control of the color and smoothness. It is to ensure you're coloring the piece without filling in the detail, too. Some blended areas on a basic model might have ten coats. On a display piece, it might have 30 or more.
For example, if you paint a yellow highlight over red with undiluted paint, it will be bright, bright yellow - you'll have a stripe. If you dilute it, it'll add a yellow tint that you can build up with additional coats until you have a subtle graduation from red to yellow.
Re: [Miniatures] Painting tips and progress reports (with pi
Posted: Thu Oct 18, 2012 11:49 pm
by baelthazar
Blackhawk wrote:It depends on the application and the color. For base coating, 1-1. For careful layering and building up of highlights, I dilute as much as 4-1. The dilution isn't just to make it liquid, it is to give control of the color and smoothness. It is to ensure you're coloring the piece without filling in the detail, too. Some blended areas on a basic model might have ten coats. On a display piece, it might have 30 or more.
For example, if you paint a yellow highlight over red with undiluted paint, it will be bright, bright yellow - you'll have a stripe. If you dilute it, it'll add a yellow tint that you can build up with additional coats until you have a subtle graduation from red to yellow.
At my skill level, I'm fairly basic with the dilution tricks. I tend toward just solid colors at the moment, but my A Touch of Evil characters reflect that in their live-action pics on the cards and character sheets. Now... when I get to the Descent Second Edition guys, I'm certain I will need some more sophisticated methods and so this post it very much helpful.
I am finding that these Reaper HD paints are pretty easy to control and are butter smooth without any dilution. It feels weird not to dilute, however, because the craft paints I used required a lot of water or water/flow-aid mix to be that buttery smooth. ATM, I've been doing a 1:1 or so ratio and it works pretty well. I'm a bit lazy, so I've been relying on some Les's Magic Wash that I mixed up (black) to basically to the shading. I think it works pretty well, but I might go get some sepia or burnt umber ink to make a brown version for flesh (to avoid that "dirty" look). I bought Kevin Dalimore's book and I'm not very enthusiastic about that cartoon three-shade style.
I really only do two or three coats, so that hasn't been an issue. As I said, I've yet to learn blending. And I don't have any aspiration to do display pieces, just boardgame use pieces. Any advice on blending or places to go to read about it?
Re: [Miniatures] Painting tips and progress reports (with pi
Posted: Fri Oct 19, 2012 9:13 am
by Blackhawk
I'll try and dig up some links in a bit. One tip in the meantime: vary your wash colors. Black is great for silver (say, armor) and grays, but to dark for most other applications. Try brown for flesh, tans, browns, yellows, and reds. Green for green, blue for blue.
Look at a wadded up red shirt. The shadows are dark red. Shadows on a brown shirt are brown. Only rarely will you find shadows that are actually black in nature, and on a miniature the contrast tends to be too intense.
Re: [Miniatures] Painting tips and progress reports (with pi
Posted: Thu Nov 08, 2012 12:09 pm
by Zaxxon
Need more photos.
Re: [Miniatures] Painting tips and progress reports (with pi
Posted: Thu Nov 08, 2012 12:29 pm
by Blackhawk
There are more coming, I just need to have time free for painting.
Between kids, kids' homework, two birthdays and Halloween in the past six weeks, I've had little free time. And to be honest, the stuff I brought up in my Project thread has been leaving me wiped out and exhausted by evening most days.
Re: [Miniatures] Painting tips and progress reports (with pi
Posted: Thu Nov 08, 2012 1:01 pm
by Isgrimnur
Mineral spirits and Tamiya acrylics do not mix.
I finished painting the one piece in the model that needed to be metallic blue, then I wandered off, leaving the bottle open overnight. The mineral spirits has worked great for the Model Masters acrylics, allowing me to airbrush the SG Black. So I added some to the Tamiya bottle to try and get the fluid level back up, shook it ... and watched it separate like a cheap salad dressing when I opened it back up.
Re: [Miniatures] Painting tips and progress reports (with pi
Posted: Thu Nov 08, 2012 1:35 pm
by Blackhawk
Yeah, acrylics are thinned (and cleaned) with plain old water. You can use tap, but I personally keep distilled on hand for it, as I don't need the various chemicals added to the paint, especially with the hard water we have here.
Re: [Miniatures] Painting tips and progress reports (with pi
Posted: Thu Nov 08, 2012 2:19 pm
by TiLT
Zaxxon wrote:Need more photos.
It's November. There are too many games to play.
Re: [Miniatures] Painting tips and progress reports (with pi
Posted: Thu Nov 08, 2012 4:25 pm
by Zaxxon
TiLT wrote:Zaxxon wrote:Need more photos.
It's November. There are too many games to play.
I need to be an expert by March. Help me, OObi-wan. You're my only hope.
Re: [Miniatures] Painting tips and progress reports (with pi
Posted: Thu Nov 08, 2012 4:29 pm
by coopasonic
Zaxxon wrote:TiLT wrote:Zaxxon wrote:Need more photos.
It's November. There are too many games to play.
I need to be an expert by March. Help me, OObi-wan. You're my only hope.
Then start painting and asking questions. We'll all learn from your experience.
Re: [Miniatures] Painting tips and progress reports (with pi
Posted: Thu Nov 08, 2012 4:32 pm
by Zaxxon
coopasonic wrote:Zaxxon wrote:TiLT wrote:Zaxxon wrote:Need more photos.
It's November. There are too many games to play.
I need to be an expert by March. Help me, OObi-wan. You're my only hope.
Then start painting and asking questions. We'll all learn from your experience.
Ha. I'm sure you'll all be entertained by my experience. I'm waiting for my Reaper set to arrive in March to start.
Re: [Miniatures] Painting tips and progress reports (with pi
Posted: Thu Nov 08, 2012 9:27 pm
by raydude
So I got my set of 6mm miniatures from DVG games. It is a set of modern warfare vehicles and aircraft for use in the Thunderbolt-Apache Leader solitaire boardgame. They are metal miniatures, which I have never painted before. I tried in vain to search for basic tips on how to paint metal miniatures but found nothing very useful. So I decided to start with a white acrylic wash with a 6:1 ratio of water to paint. My reasoning was that since these things were so small I didn't want to have thick paint that would obscure the details. Btw these miniatures are manufactured by pico armor and internet word of mouth has it that their 6mm line is very nice and very detailed. And looking at this set I would have to say that's true.
After the white wash I painted on a thin basic color. About 2:1 water to paint ratio.
Light tan for the T-72s, a leather color for the infantry. Note the penny for size reference.
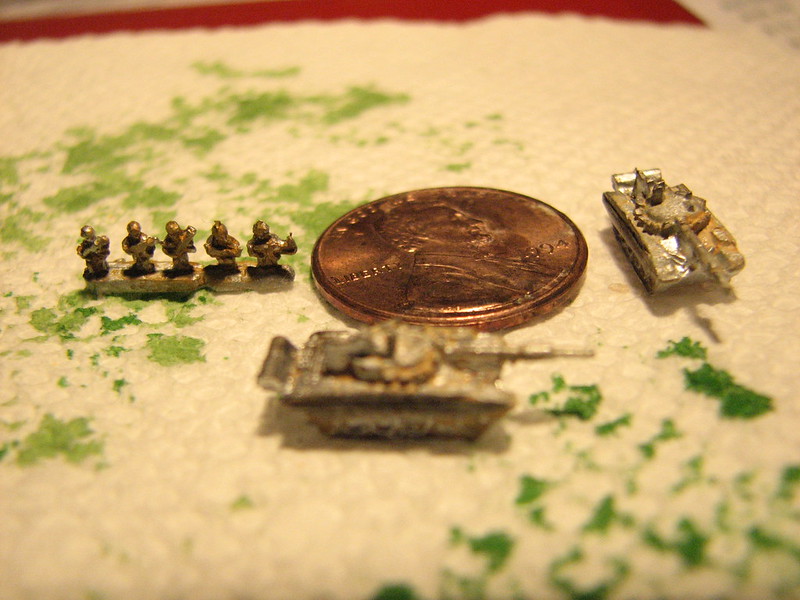
Light green for the mobile AAA, SAM vehicles and trucks. These suckers are tiny!

Darker Green for the Apaches

I was thinking of doing a black wash on the vehicles, letting the black ooze into the nooks and crannies to bring out the details. Other than that I don't have any ideas on making them better. Any suggestions?
Re: [Miniatures] Painting tips and progress reports (with pi
Posted: Thu Nov 08, 2012 9:48 pm
by Blackhawk
With something that small, it is hard to hand paint the details, and a wash would be the way to go. I'd consider doing a brown wash rather than a black, though.
Re: [Miniatures] Painting tips and progress reports (with pi
Posted: Sat Nov 10, 2012 6:28 pm
by baelthazar
I bought an Ottlite and my Reaper HD paint is magnificent. I'll try to upload some pics soon Zaxxon.


