2024 Fundraising - $329 / $2000 CDN for the year, June/July Renewal. Paypal Donation Link US dollars
[Miniatures] Painting tips and progress reports (with pics!)
Moderators: The Preacher, $iljanus, Zaxxon
-
hentzau

- Posts: 15159
- Joined: Thu Oct 21, 2004 11:06 am
- Location: Castle Zenda, Ruritania
Re: [Miniatures] Painting tips and progress reports (with pi
I'm really itching to paint my Mice and Mystics figs. They're really great models.
“We can never allow Murania to become desecrated by the presence of surface people. Our lives are serene, our minds are superior, our accomplishments greater. Gene Autry must be captured!!!” - Queen Tika, The Phantom Empire
-
raydude

- Posts: 3896
- Joined: Mon Oct 18, 2004 9:22 am
Re: [Miniatures] Painting tips and progress reports (with pi
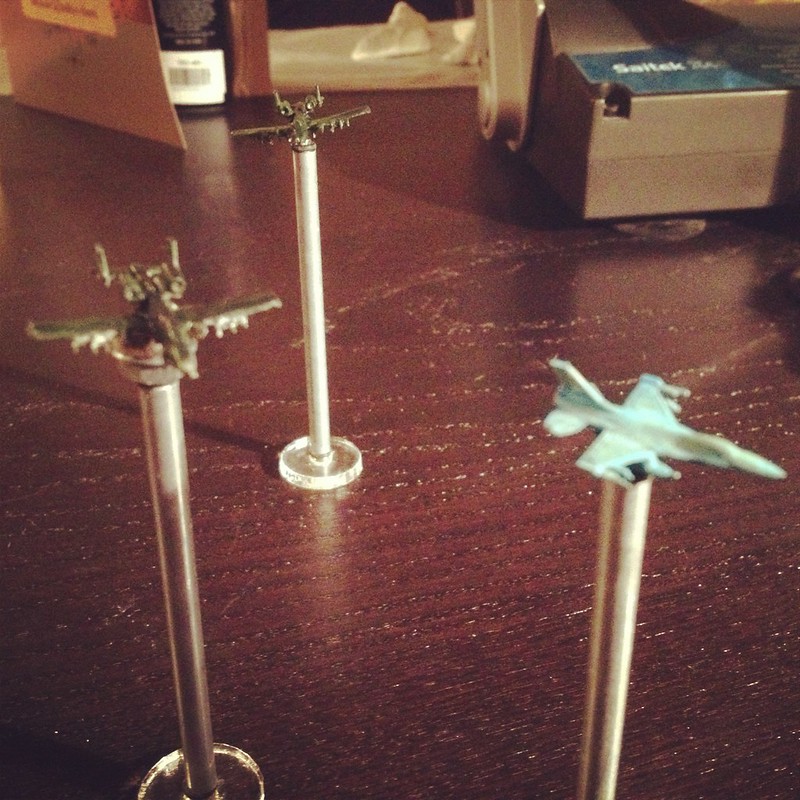
These don't really have a lot of complexity in color since they are really small (1/600 scale) and so I really can't do much else with them without obscuring the fine detail. But they look nice compared to their original unpainted state. I decided not to put the tail rotors on, but I may try putting it on one to see how much trouble it is versus how much it improves the model.
Apaches along the ridgeline spot a Scud missile launcher in the valley.
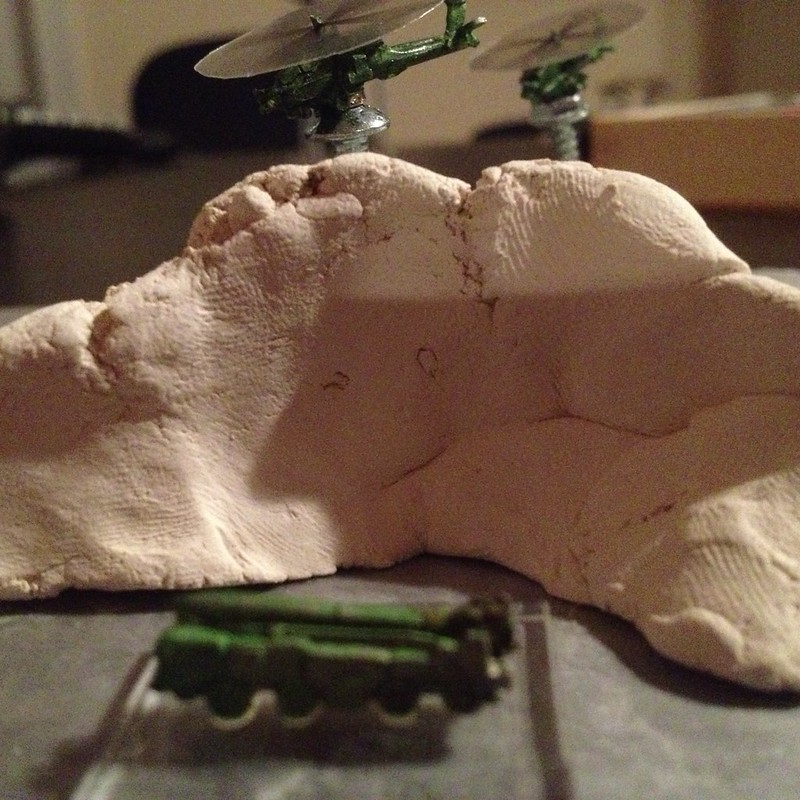
F-16 flies escort for 2 A-10s on a bombing run
Hinds on patrol
A mixed force of Army Apaches and Marine Cobras on a mission. UAV flies high altitude reconnaissance.
Apaches along the ridgeline spot a Scud missile launcher in the valley.
F-16 flies escort for 2 A-10s on a bombing run
Hinds on patrol
A mixed force of Army Apaches and Marine Cobras on a mission. UAV flies high altitude reconnaissance.
-
Blackhawk

- Posts: 44293
- Joined: Tue Oct 12, 2004 9:48 pm
- Location: Southwest Indiana
Re: [Miniatures] Painting tips and progress reports (with pi
Choppers incoming! We're screwed!

Seriously, though - I like those.
Seriously, though - I like those.
(˙pǝsɹǝʌǝɹ uǝǝq sɐɥ ʎʇıʌɐɹƃ ʃɐuosɹǝd ʎW)
-
raydude
- Posts: 3896
- Joined: Mon Oct 18, 2004 9:22 am
Re: [Miniatures] Painting tips and progress reports (with pi
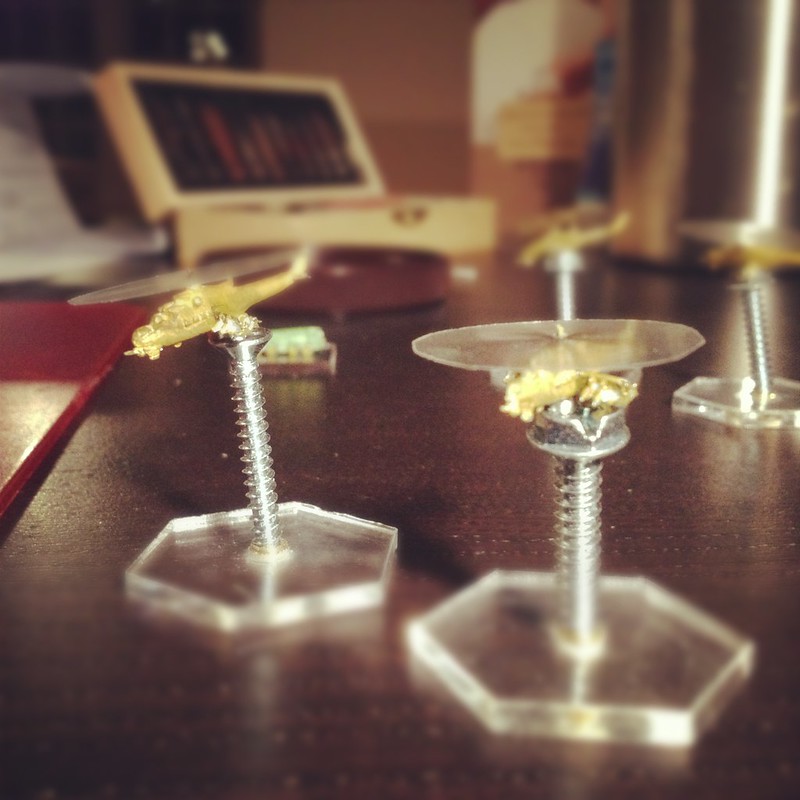
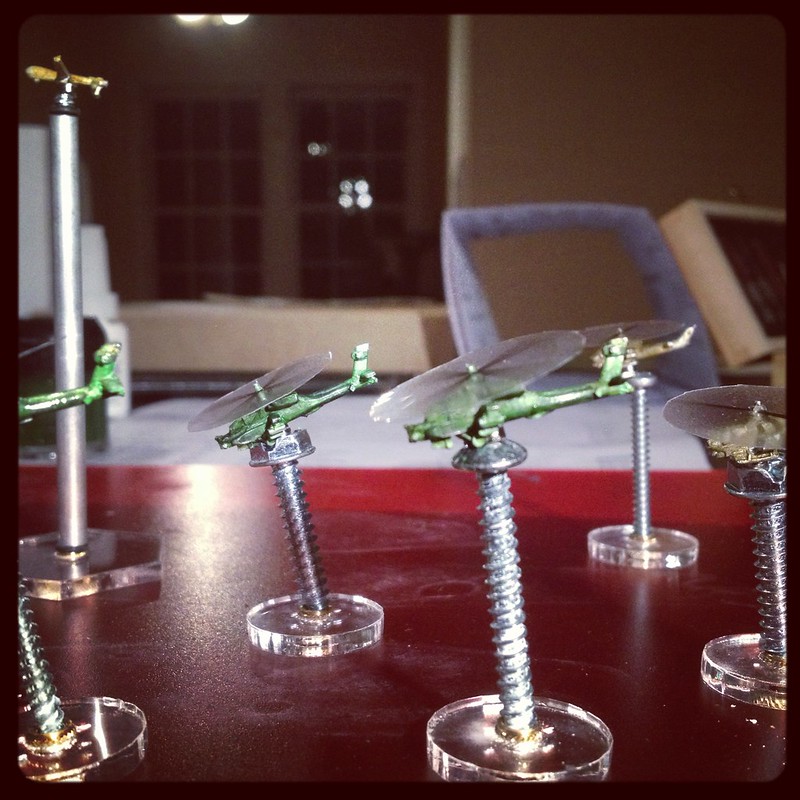
It was an homage to Da Vinci's original helicopter design - the airscrew.Blackhawk wrote:Choppers incoming! We're screwed!
Seriously, though - I like those.
Or the fact that I didn't order the 1.5" rods from the site that sold me the bases.
-
Isgrimnur

- Posts: 82532
- Joined: Sun Oct 15, 2006 12:29 am
- Location: Chookity pok
- Contact:
Re: [Miniatures] Painting tips and progress reports (with pi
Should make autorotation easier in the long run.
It's almost as if people are the problem.
-
baelthazar

- Posts: 4437
- Joined: Thu Aug 09, 2007 10:12 am
- Location: Indiana
Re: [Miniatures] Painting tips and progress reports (with pi
Arise thread!
Alright, I finally got a chance to upload a couple of pics of my latest endeavor. These Descent 2nd Edition figures are tiny and very detailed, but I am happy how he came out:
The Reaper paints are pretty fantastic... but the Les's magic wash really seals the deal. Yes, I know it is lazy, but I like the way the wash makes the minis look!
My Youtube channel: https://www.youtube.com/user/CythUulu/videos
-
YellowKing

- Posts: 30274
- Joined: Wed Oct 13, 2004 2:02 pm
Re: [Miniatures] Painting tips and progress reports (with pi
I pretty much abandoned my project. Life is just waaaay too busy for me right now. Maybe once the kids get a bit older I can resume.
-
coopasonic

- Posts: 21011
- Joined: Fri Mar 04, 2005 11:43 pm
- Location: Dallas-ish
Re: [Miniatures] Painting tips and progress reports (with pi
That looks awesome baelthazar. I am now dreading the arrival of my reaper bits. The weight of all the possibilities will be heavy.
-Coop
Black Lives Matter
Black Lives Matter
-
Smoove_B

- Posts: 54837
- Joined: Wed Oct 13, 2004 12:58 am
- Location: Kaer Morhen
Re: [Miniatures] Painting tips and progress reports (with pi
Weird. My buddy just finished painting the same exact figure and is now working his way through some of the monsters. Small world. 
Maybe next year, maybe no go
-
Boudreaux

- Posts: 2816
- Joined: Fri Oct 15, 2004 12:18 am
- Location: St. Louis
Re: [Miniatures] Painting tips and progress reports (with pi
Finally finished my hunters from the Fury of Dracula board game:
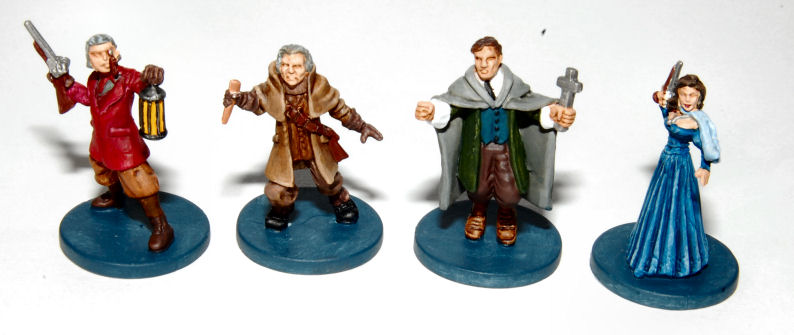
I tried to do more shading and highlighting this time around than I usually do. Overall, given the craft paints I'm using and the fact that these are not the best miniature models I've ever seen, I'm fairly happy with how they turned out.
I like the highlighting effects I managed to get with Godalming and Van Helsing, particularly the colors on Van Helsing's coat:
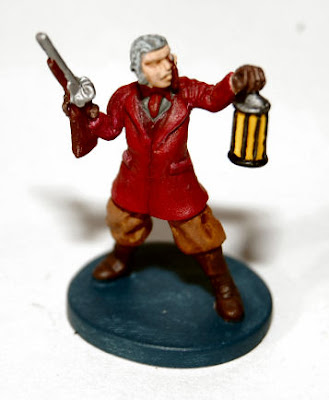
However, the shading on Dr. Seward's cloak is just meh:
Painted it dark grey, then washed with GW's Badab Black wash, then went back and highlighted with a lighter grey. The black wash really seems to want to puddle and create those dark lines around where it dried, rather than a more gradual darkening.
Any suggestions on a better way to approach this? I can't decide if I'd have been better off creating my own wash with darker greys, or what.
I tried to do more shading and highlighting this time around than I usually do. Overall, given the craft paints I'm using and the fact that these are not the best miniature models I've ever seen, I'm fairly happy with how they turned out.
I like the highlighting effects I managed to get with Godalming and Van Helsing, particularly the colors on Van Helsing's coat:
However, the shading on Dr. Seward's cloak is just meh:
Painted it dark grey, then washed with GW's Badab Black wash, then went back and highlighted with a lighter grey. The black wash really seems to want to puddle and create those dark lines around where it dried, rather than a more gradual darkening.
Any suggestions on a better way to approach this? I can't decide if I'd have been better off creating my own wash with darker greys, or what.
-
baelthazar
- Posts: 4437
- Joined: Thu Aug 09, 2007 10:12 am
- Location: Indiana
Re: [Miniatures] Painting tips and progress reports (with pi
Bordreaux, those look very nice! I see you use the Dallimore "three shade" method for painting minis. I'm not sold on the aesthetic, you pull it off, but I think it is too much work overall (given it takes me some hours just to do a quick method).
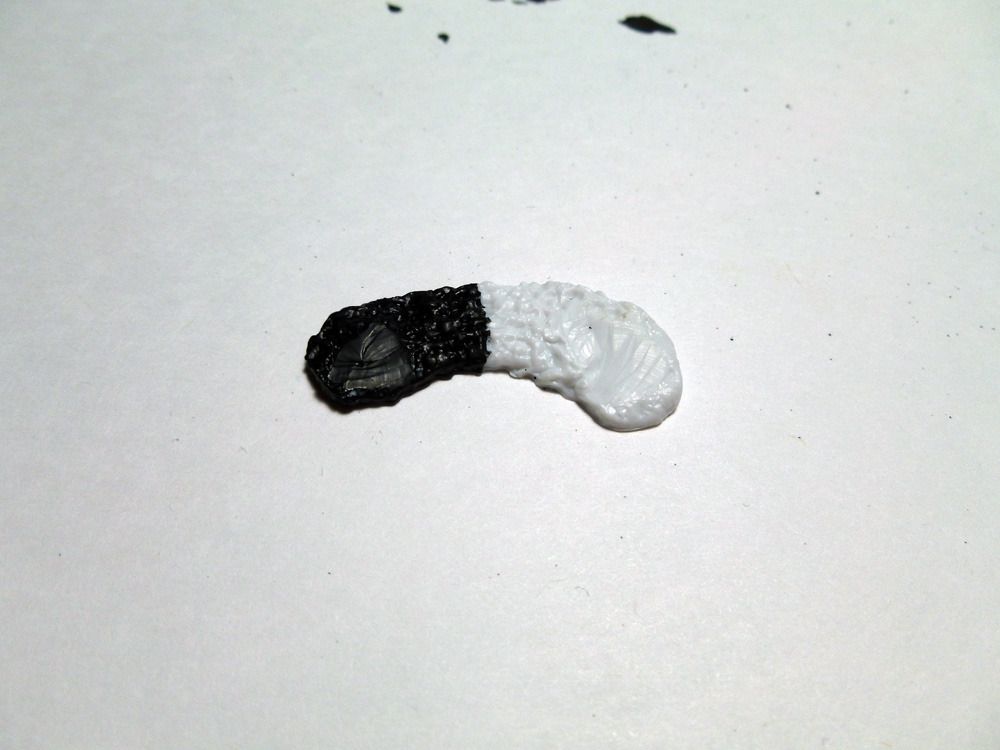
I actually use Les's Magic Wash to "simulate" shading, because I'm no good at it. You are going to get that pooling like you mention, but I wonder if you have the mix at an optimal level. The wash itself should leave behind a grey "darkening' on everything it touches but only get really dark in the crevices. Look at my recently painted zombie (from Zombiecide) here:
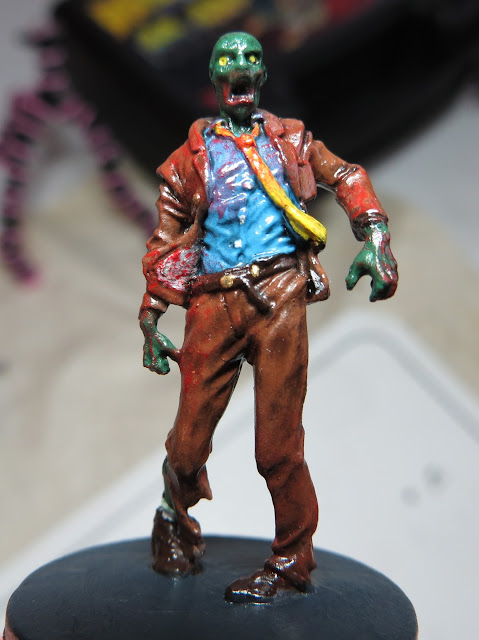
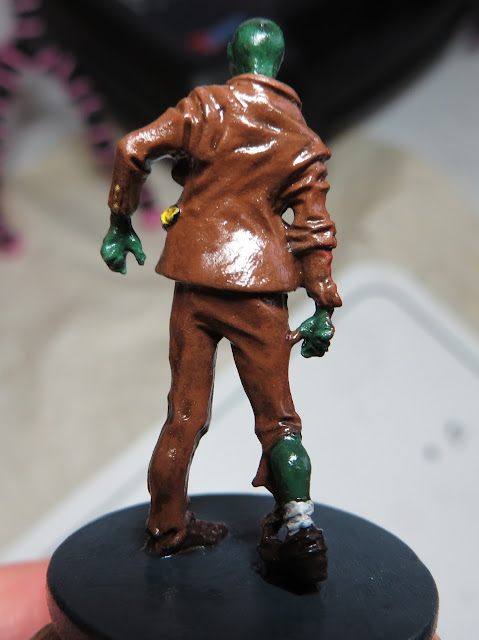
I made my own Les's wash, and you need to make sure the acrylic medium and flow aid are in proper proportion (not much flow aid, quite a bit of medium and 1/2 water). See how it darkened everything but settled in the cracks? Also, I pretty well slather the model, then go back over and use the brush to "suck up" any excess in places I don't want to be too dark. Gravity helps to keep it where you want it as well.
But I actually like the way it turned out on your minis. Given the Dallimore method looks a bit "cartoony" already, heavy black lines just aid the effect.
I actually use Les's Magic Wash to "simulate" shading, because I'm no good at it. You are going to get that pooling like you mention, but I wonder if you have the mix at an optimal level. The wash itself should leave behind a grey "darkening' on everything it touches but only get really dark in the crevices. Look at my recently painted zombie (from Zombiecide) here:
I made my own Les's wash, and you need to make sure the acrylic medium and flow aid are in proper proportion (not much flow aid, quite a bit of medium and 1/2 water). See how it darkened everything but settled in the cracks? Also, I pretty well slather the model, then go back over and use the brush to "suck up" any excess in places I don't want to be too dark. Gravity helps to keep it where you want it as well.
But I actually like the way it turned out on your minis. Given the Dallimore method looks a bit "cartoony" already, heavy black lines just aid the effect.
My Youtube channel: https://www.youtube.com/user/CythUulu/videos
-
Boudreaux
- Posts: 2816
- Joined: Fri Oct 15, 2004 12:18 am
- Location: St. Louis
Re: [Miniatures] Painting tips and progress reports (with pi
Okay, I'll take your word for it.baelthazar wrote:Bordreaux, those look very nice! I see you use the Dallimore "three shade" method for painting minis. I'm not sold on the aesthetic, you pull it off, but I think it is too much work overall (given it takes me some hours just to do a quick method).
The wash I'm using is straight out of the bottle - it's a ready-to-use wash made by Games Workshop. I've had pretty good success with it in the past, not sure why it didn't seem to work as well this time. I should probably try making my own wash, since then I could use whatever color I wanted instead of just brown or black.
-
baelthazar
- Posts: 4437
- Joined: Thu Aug 09, 2007 10:12 am
- Location: Indiana
Re: [Miniatures] Painting tips and progress reports (with pi
Wow! If that is just a wash method, you really pull off the complicated Dallimore look, which requires painting dark, then light over it, then highlight color on top. I found a blog with the Les's wash recipe and you can make it in whatever color you can find of acrylic ink (a lot). It does make them look a little dirty, but you can highlight over it.
My Youtube channel: https://www.youtube.com/user/CythUulu/videos
-
Boudreaux
- Posts: 2816
- Joined: Fri Oct 15, 2004 12:18 am
- Location: St. Louis
Re: [Miniatures] Painting tips and progress reports (with pi
Yeah, that's not quite how I did these. I started with a primer coat, then painted the base colors. After that I did a dark wash (either brown or black, usually). Finally, I went back with highlight colors to pick up the accent areas. Usually this is just a single highlight color, sometimes I used 2 or 3 highlight colors in varying levels of lightness.baelthazar wrote:Wow! If that is just a wash method, you really pull off the complicated Dallimore look, which requires painting dark, then light over it, then highlight color on top.
As I said, I was kind of experimenting here. I'm not sure I'd do it again. The highlighting looks ok, but in the future I'd probably do less of it and use drybrushing when I do.
I painted the minis for my copy of Earth Reborn awhile back, and in a few of those cases the highlighting turned out really well (IMO). I'll have to post a photo of one for comparison.
-
Blackhawk
- Posts: 44293
- Joined: Tue Oct 12, 2004 9:48 pm
- Location: Southwest Indiana
Re: [Miniatures] Painting tips and progress reports (with pi
The Bones gnoll is nearing completion, and the write-up will follow, all before Reaper sends out their pledge rewards next month.
(˙pǝsɹǝʌǝɹ uǝǝq sɐɥ ʎʇıʌɐɹƃ ʃɐuosɹǝd ʎW)
-
Zaxxon

- Forum Moderator
- Posts: 28140
- Joined: Wed Oct 13, 2004 12:11 am
- Location: Surrounded by Mountains
Re: [Miniatures] Painting tips and progress reports (with pi
Blackhawk wrote:The Bones gnoll is nearing completion, and the write-up will follow, all before Reaper sends out their pledge rewards next month.
-
Blackhawk
- Posts: 44293
- Joined: Tue Oct 12, 2004 9:48 pm
- Location: Southwest Indiana
Re: [Miniatures] Painting tips and progress reports (with pi
Yeah, yeah. I had one of those winters and have only begun to get back on track over the last month or so.
(˙pǝsɹǝʌǝɹ uǝǝq sɐɥ ʎʇıʌɐɹƃ ʃɐuosɹǝd ʎW)
-
TiLT

- Posts: 4435
- Joined: Sun Oct 17, 2004 7:01 am
- Location: Trondheim, Norway
- Contact:
Re: [Miniatures] Painting tips and progress reports (with pi
Me too. I got serious eyestrain before Christmas and had to start wearing glasses in January. I'm still trying to get used to them, but the whole thing put miniature painting on hold. I'm going to try and paint at least a couple of my Reaper minis before the horde arrives though.Blackhawk wrote:Yeah, yeah. I had one of those winters and have only begun to get back on track over the last month or so.
Insert witty comment here.
-
Isgrimnur
- Posts: 82532
- Joined: Sun Oct 15, 2006 12:29 am
- Location: Chookity pok
- Contact:
Re: [Miniatures] Painting tips and progress reports (with pi


Tamiya Flat Black and I don't seem to get along from brush painting.
It's almost as if people are the problem.
-
Blackhawk
- Posts: 44293
- Joined: Tue Oct 12, 2004 9:48 pm
- Location: Southwest Indiana
Re: [Miniatures] Painting tips and progress reports (with pi
Alrighty, back in the saddle. It's been a few months since my last big post - sorry 'bout that. Here is a handy reference to what I already posted in my write-up of the basics.
Basic types of painting
Tools and materials
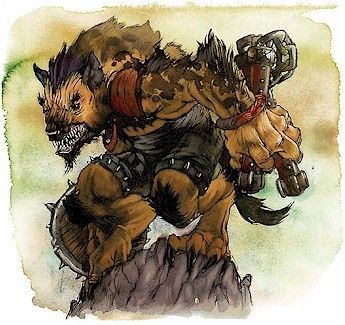
Example - Bones gnoll, research, prep, basing
Example - Bones gnoll, planning the paint job
I'm going to re-post the reference images, as I may be referring back to them.
Ok, we have Boneflayer cleaned, based, and primed, and we have decided on a look and planned the paint job. Now it is time to put brush to paint and swear a lot. One caveat: A miniature in-progress often looks like ass, as many areas don't look 'right' until the final steps have been applied. I'll be putting specific techniques into spoiler tags.
Gnolls for a Batman game. Here I've painted the eyes and mouth. Boneflayer has tiny, tiny eyes, and he's a horrible piece to use as an example for painting eyes. I may post a separate piece on eyes later on. Since his eyes were so small and beady, I decided to go simple on them. I painted them with Moon Yellow (most of my paints are Vallejo, with a few Reaper colors mixed in) then gave them a wash with thinned down red (I'll describe washes in more detail later.) The effect was an unhealthy looking bloodshot eye. Next I painted the gums with Scarlet Red, then the teeth with Pale Sand. The whole thing looks a little silly at this point, but there is no reason to 'stay within the lines' at this stage, as you'll see on the next image.
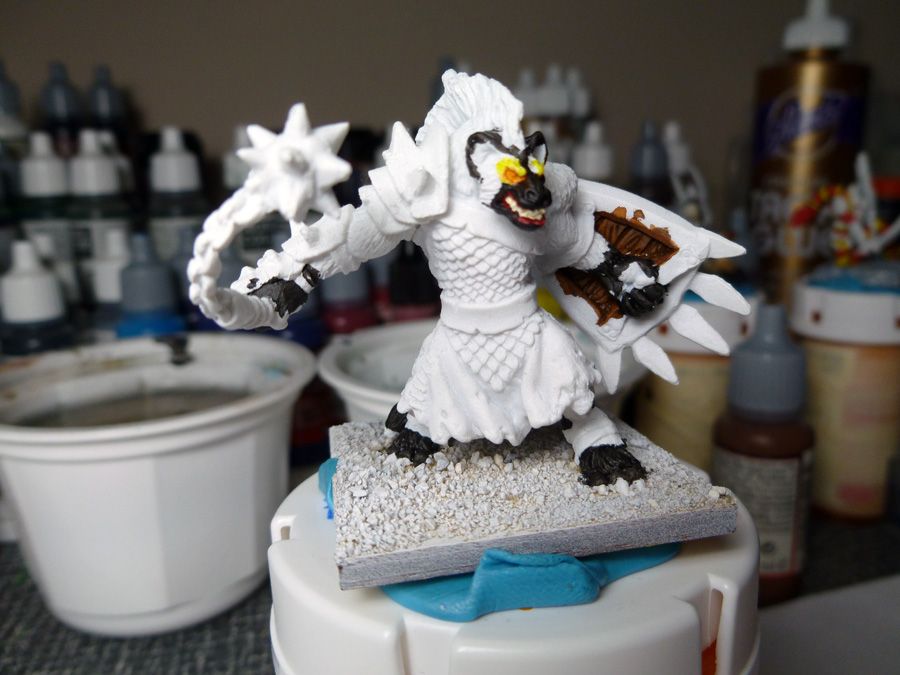
Here I've looked at our reference images and decided to darken the feet and hands as well as the muzzle and ears to add a little contrast to the piece. I mixed two parts Charred Brown with one part black to get the color, and thinned* a little less than 1:1. Leaving it a little thicker gives better coverage without sacrificing too much control, and leaving the paint too thin might have caused it to bleed over the teeth and gums.
*On thinning:
Now you can see the plan with the Joker face - painting the fur right up to the gums and teeth, and covering the unnecessary overpaint from earlier can result in a cleaner paint job than trying to go back in and paint those tiny areas in later.
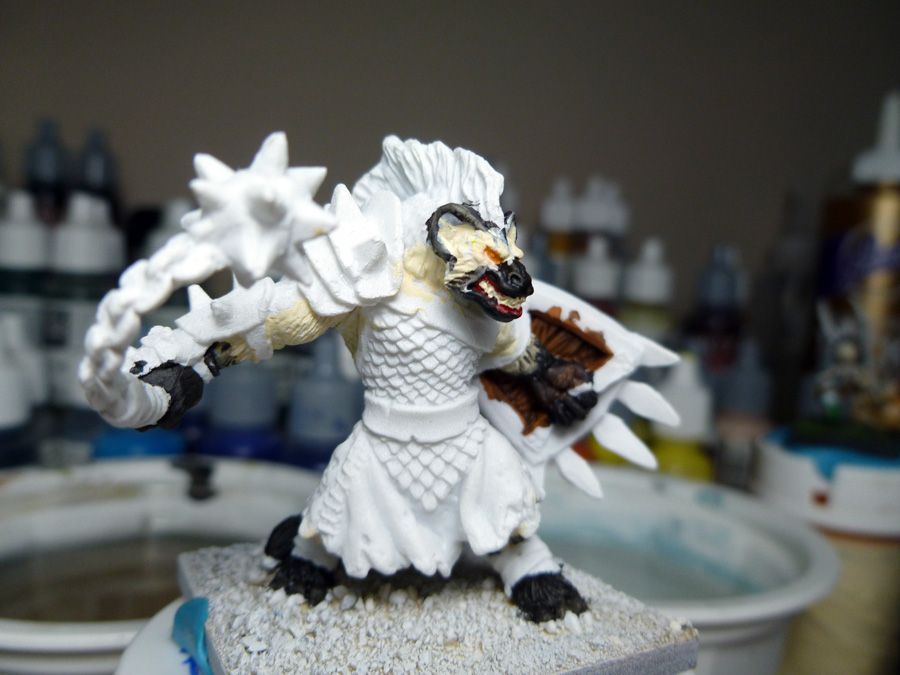
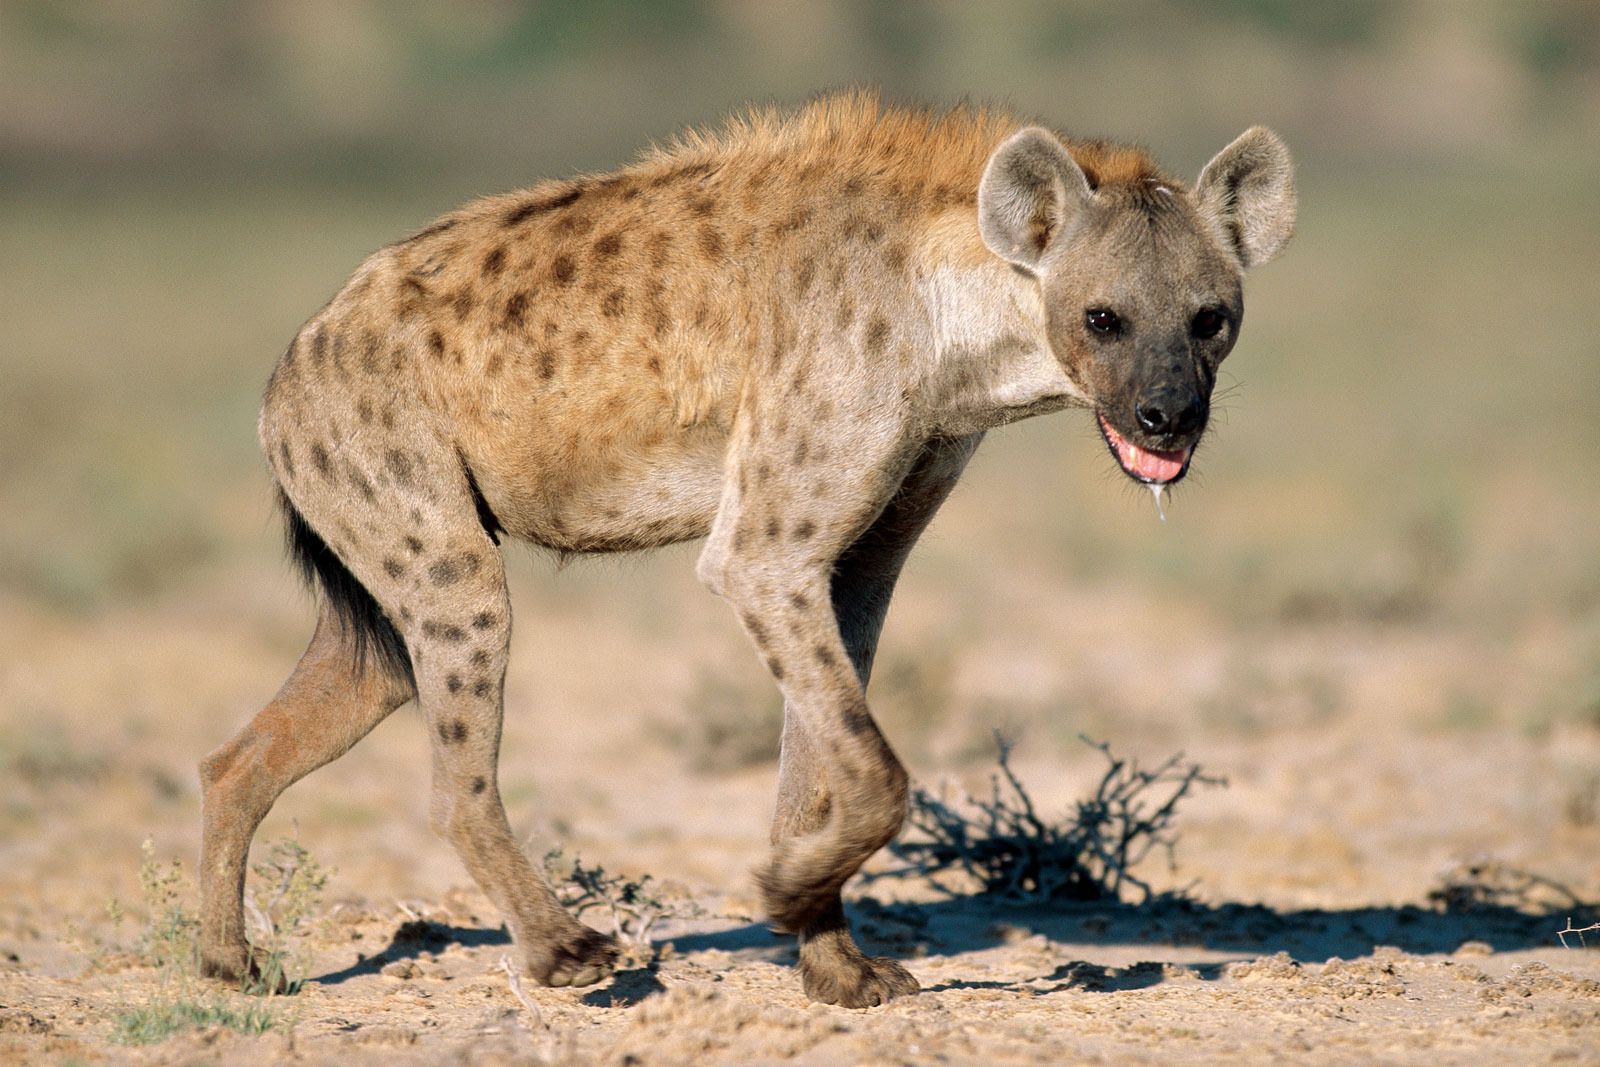
Here I've taken Pale Sand and painted in the pale areas around the face, plus the areas that would be the belly and insides of the legs were it a hyena, as well as finishing the clean-up around the eyes. You'll notice that I'm not really trying to create smooth transitions yet - I'm really just blocking it in, getting the right colors in the right places. I also did the shield in Beasty Brown, mainly so that I wouldn't have to try and paint it under the finished arm later (leading to nasty, hard to touch up mistakes.)
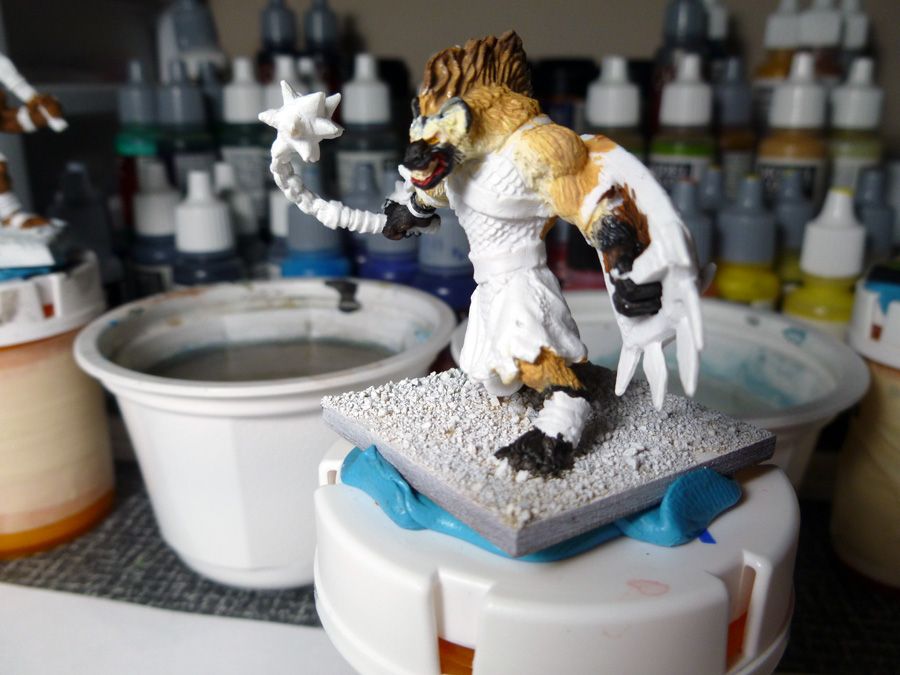
Now you can see the results of the next couple of steps. First I painted Tan Yellow over the upper areas and mane. I then went back and did some basic blending. These colors were close enough that I didn't need to do a lot.
I mixed Pale Sand (the light color) with the Tan Yellow (the middle color) and thinned them a little more than 1:1. This gave me a thin color partway between the two. I then brushed this across the border between the two colors. As it was fairly thin, it was also partly transparent, which caused it to tint both colors rather than adding a new color. This had the effect of blending the colors together. I did this anywhere that the tan and cream colors met, giving a second coat where the blend wasn't smooth enough. There were also a couple of times where I had to go back to the Pale Sand or Tan Yellow and touch something up that didn't go just right. That's perfectly fine, and going back and forth between steps is not at all uncommon.
Finally, I mixed a fairly thin Yellow-Tan plus Charred Brown and gave a couple of coats to the mane to darken it. I could have used a different brown entirely to get a similar shade, using the same colors that are already present in the fur helped to tie the whole thing together. It makes it look like a single coat of fur rather than a patchwork - in fact, the whole of the flesh and fur was done with just three colors (Pale Sand, Tan Yellow and Charred Brown) for just this reason.
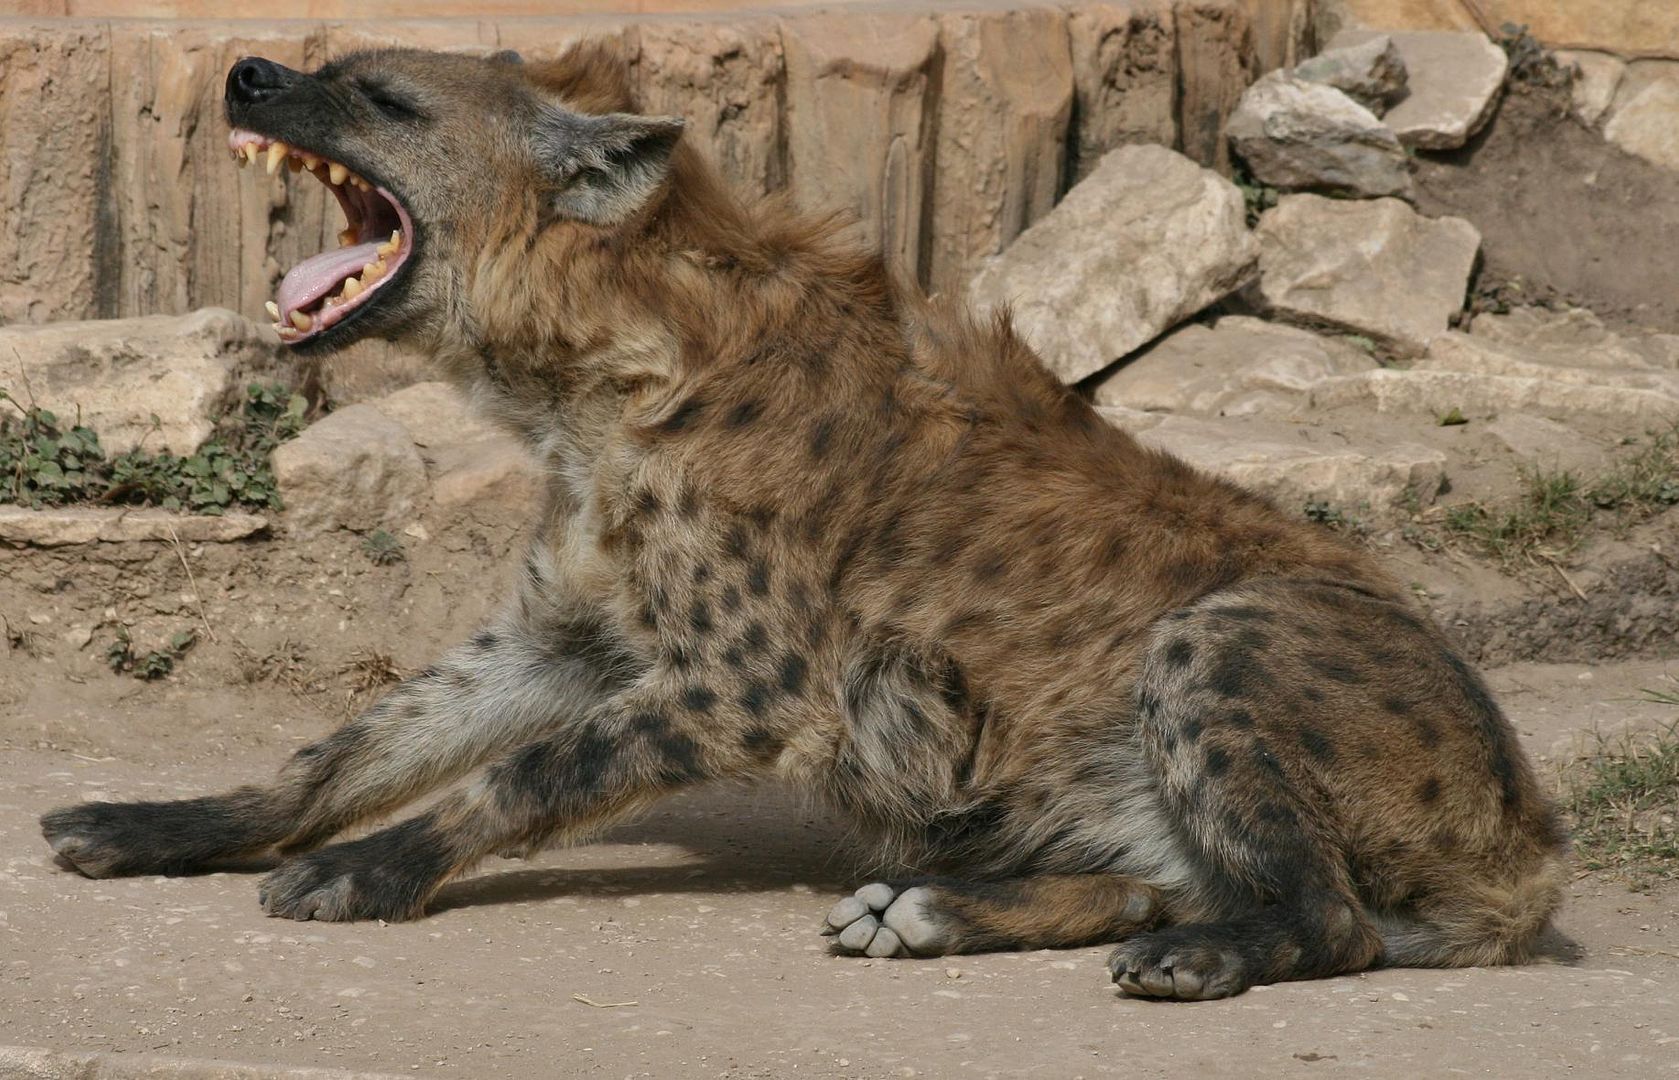
Here I've gone back to the Charred Brown + black mix we used on the feet and hands, but thinned it way down, probably 1:3 paint to flow improver. I used this to make spots. Since it was so thin, it had the effect of sinking down into the fur rather than just covering it up with the new color. Each spot took several coats to build up the color. I also used this mix to darken the line where the mane meets the neck. This was done to help the mane stand out a bit later on.
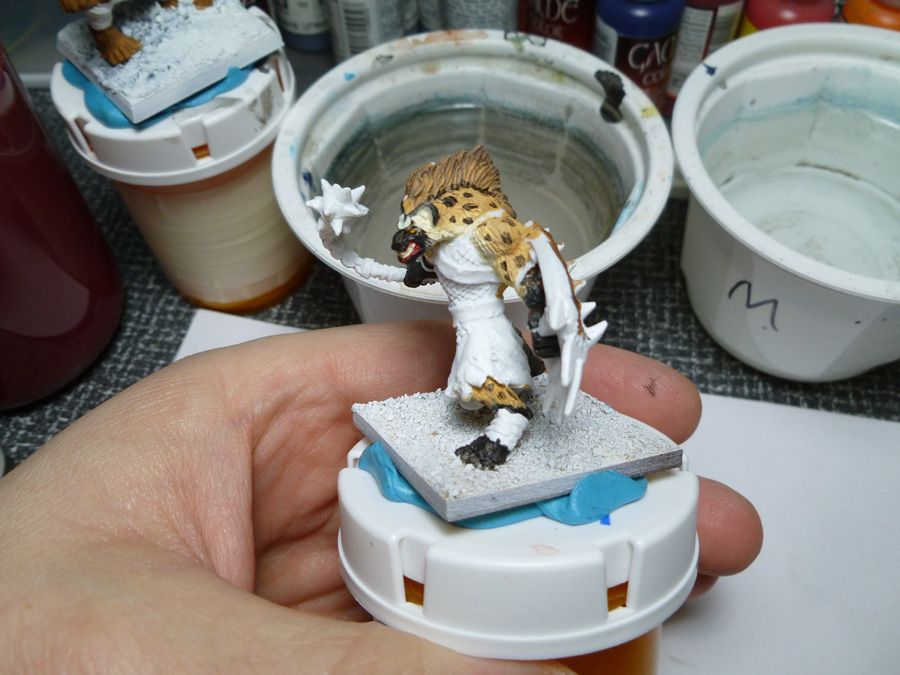
All I've done here is a bit of drybrushing* with a mix of Pale Sand and Tan Yellow to make the guard hairs across the whole piece stand out. The biggest things holding our gnoll back right now are a general lack of shading between the hairs to provide detail, as well as a bit of patchiness.
*On drybrushing:
The biggest things holding our gnoll back right now are a general lack of shading between the hairs to provide detail, as well as a bit of patchiness. That's where our first ink wash* comes in.
*On ink washes:
Ok, now I've given him a wash with the aforementioned sepia ink, thinned just a bit with water. Boneflayer still has his light and dark areas, but the wash has lightly tinted it all, tying it all together, and has filled in the crevices between the hairs. To be honest, if I had it to do over, I'd have thinned the wash a bit more, but it works as it is.
After this photo I futzed with it a bit more, drybrushing a little in a couple of spots, adding a bit more wash in a few deep areas to darken them and so forth. I won't describe each step, as it would be meaningless. It is one of those things where you just tweak the piece a little here and there until it looks the way you want it to look.
The fur is, essentially, done.
Basic types of painting
Tools and materials
Example - Bones gnoll, research, prep, basing
Example - Bones gnoll, planning the paint job
I'm going to re-post the reference images, as I may be referring back to them.
Ok, we have Boneflayer cleaned, based, and primed, and we have decided on a look and planned the paint job. Now it is time to put brush to paint and swear a lot. One caveat: A miniature in-progress often looks like ass, as many areas don't look 'right' until the final steps have been applied. I'll be putting specific techniques into spoiler tags.
Gnolls for a Batman game. Here I've painted the eyes and mouth. Boneflayer has tiny, tiny eyes, and he's a horrible piece to use as an example for painting eyes. I may post a separate piece on eyes later on. Since his eyes were so small and beady, I decided to go simple on them. I painted them with Moon Yellow (most of my paints are Vallejo, with a few Reaper colors mixed in) then gave them a wash with thinned down red (I'll describe washes in more detail later.) The effect was an unhealthy looking bloodshot eye. Next I painted the gums with Scarlet Red, then the teeth with Pale Sand. The whole thing looks a little silly at this point, but there is no reason to 'stay within the lines' at this stage, as you'll see on the next image.
Here I've looked at our reference images and decided to darken the feet and hands as well as the muzzle and ears to add a little contrast to the piece. I mixed two parts Charred Brown with one part black to get the color, and thinned* a little less than 1:1. Leaving it a little thicker gives better coverage without sacrificing too much control, and leaving the paint too thin might have caused it to bleed over the teeth and gums.
*On thinning:
Spoiler:
Here I've taken Pale Sand and painted in the pale areas around the face, plus the areas that would be the belly and insides of the legs were it a hyena, as well as finishing the clean-up around the eyes. You'll notice that I'm not really trying to create smooth transitions yet - I'm really just blocking it in, getting the right colors in the right places. I also did the shield in Beasty Brown, mainly so that I wouldn't have to try and paint it under the finished arm later (leading to nasty, hard to touch up mistakes.)
Now you can see the results of the next couple of steps. First I painted Tan Yellow over the upper areas and mane. I then went back and did some basic blending. These colors were close enough that I didn't need to do a lot.
I mixed Pale Sand (the light color) with the Tan Yellow (the middle color) and thinned them a little more than 1:1. This gave me a thin color partway between the two. I then brushed this across the border between the two colors. As it was fairly thin, it was also partly transparent, which caused it to tint both colors rather than adding a new color. This had the effect of blending the colors together. I did this anywhere that the tan and cream colors met, giving a second coat where the blend wasn't smooth enough. There were also a couple of times where I had to go back to the Pale Sand or Tan Yellow and touch something up that didn't go just right. That's perfectly fine, and going back and forth between steps is not at all uncommon.
Finally, I mixed a fairly thin Yellow-Tan plus Charred Brown and gave a couple of coats to the mane to darken it. I could have used a different brown entirely to get a similar shade, using the same colors that are already present in the fur helped to tie the whole thing together. It makes it look like a single coat of fur rather than a patchwork - in fact, the whole of the flesh and fur was done with just three colors (Pale Sand, Tan Yellow and Charred Brown) for just this reason.
Here I've gone back to the Charred Brown + black mix we used on the feet and hands, but thinned it way down, probably 1:3 paint to flow improver. I used this to make spots. Since it was so thin, it had the effect of sinking down into the fur rather than just covering it up with the new color. Each spot took several coats to build up the color. I also used this mix to darken the line where the mane meets the neck. This was done to help the mane stand out a bit later on.
All I've done here is a bit of drybrushing* with a mix of Pale Sand and Tan Yellow to make the guard hairs across the whole piece stand out. The biggest things holding our gnoll back right now are a general lack of shading between the hairs to provide detail, as well as a bit of patchiness.
*On drybrushing:
Spoiler:

*On ink washes:
Spoiler:
Ok, now I've given him a wash with the aforementioned sepia ink, thinned just a bit with water. Boneflayer still has his light and dark areas, but the wash has lightly tinted it all, tying it all together, and has filled in the crevices between the hairs. To be honest, if I had it to do over, I'd have thinned the wash a bit more, but it works as it is.
After this photo I futzed with it a bit more, drybrushing a little in a couple of spots, adding a bit more wash in a few deep areas to darken them and so forth. I won't describe each step, as it would be meaningless. It is one of those things where you just tweak the piece a little here and there until it looks the way you want it to look.
The fur is, essentially, done.
(˙pǝsɹǝʌǝɹ uǝǝq sɐɥ ʎʇıʌɐɹƃ ʃɐuosɹǝd ʎW)
-
Blackhawk
- Posts: 44293
- Joined: Tue Oct 12, 2004 9:48 pm
- Location: Southwest Indiana
Re: [Miniatures] Painting tips and progress reports (with pi
FYI, I just put the final coat of varnish on Boneflayer. He's done and the photos are done, so I just need to get them resized, uploaded, and written up.
(˙pǝsɹǝʌǝɹ uǝǝq sɐɥ ʎʇıʌɐɹƃ ʃɐuosɹǝd ʎW)
-
Zaxxon
- Forum Moderator
- Posts: 28140
- Joined: Wed Oct 13, 2004 12:11 am
- Location: Surrounded by Mountains
Re: [Miniatures] Painting tips and progress reports (with pi
*cough*Blackhawk wrote:FYI, I just put the final coat of varnish on Boneflayer. He's done and the photos are done, so I just need to get them resized, uploaded, and written up.
Sorry; I'm really enjoying this thread. Is it March yet?
-
Zurai

- Posts: 4866
- Joined: Sun Oct 17, 2004 11:30 pm
Re: [Miniatures] Painting tips and progress reports (with pi
Almost!Zaxxon wrote:Sorry; I'm really enjoying this thread. Is it March yet?
I'll actually probably be posting some shots of painted Bones minis, myself, although I'm sure my friend's that I split the order with will put mine to shame. He paints faster, too, to add insult to injury.
-
Blackhawk
- Posts: 44293
- Joined: Tue Oct 12, 2004 9:48 pm
- Location: Southwest Indiana
Re: [Miniatures] Painting tips and progress reports (with pi
Glazing is a fairly important skill, but there wasn't a whole lot of it in use on this piece. I just found a fantastic article on glazing that is well worth the read.Blackhawk wrote: *On ink washes:
Spoiler:
(˙pǝsɹǝʌǝɹ uǝǝq sɐɥ ʎʇıʌɐɹƃ ʃɐuosɹǝd ʎW)
-
TiLT
- Posts: 4435
- Joined: Sun Oct 17, 2004 7:01 am
- Location: Trondheim, Norway
- Contact:
Re: [Miniatures] Painting tips and progress reports (with pi
Like Blackhawk, I decided to try painting one of my gnoll Reaper Bones minis. Unlike Blackhawk, I'm still a rank amateur. I used the images of gnolls from the 4th edition D&D Monster Manual as a baseline and decided to go for a less cartoony look. While sharp contrasts like in Blackhawk's mini can be great, I didn't really feel it fit what I was looking for in this particular model. Instead I went for a more subtle, hopefully more natural look.
I did things by hand this time. No quickshade, though I did use a bit of Citadel Shade here and there, supplemented with highlighting and detail work as I saw fit. In hindsight I should have done the metal surfaces in a different way as they didn't turn out quite the way I had hoped, but done is done. Here's the result, with an unpainted gnoll included for comparison:


I did things by hand this time. No quickshade, though I did use a bit of Citadel Shade here and there, supplemented with highlighting and detail work as I saw fit. In hindsight I should have done the metal surfaces in a different way as they didn't turn out quite the way I had hoped, but done is done. Here's the result, with an unpainted gnoll included for comparison:
Insert witty comment here.
-
coopasonic
- Posts: 21011
- Joined: Fri Mar 04, 2005 11:43 pm
- Location: Dallas-ish
Re: [Miniatures] Painting tips and progress reports (with pi
That looks awesome. I envy both your skills and patience.
-Coop
Black Lives Matter
Black Lives Matter
-
Blackhawk
- Posts: 44293
- Joined: Tue Oct 12, 2004 9:48 pm
- Location: Southwest Indiana
Re: [Miniatures] Painting tips and progress reports (with pi
Seriously, that's a pretty damned awesome job. Your color scheme, by the way, is very very close to mine.
Everything is ready for me to finish my write-up, by the way, I just need to get my new campaign ready to run to clear my table. That includes miniatures for my PCs.
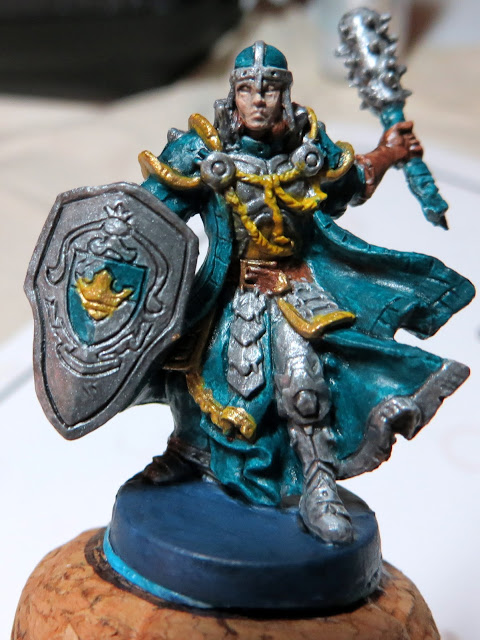
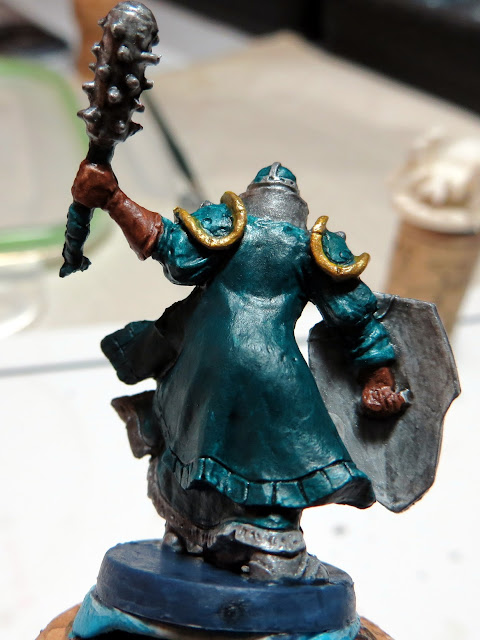
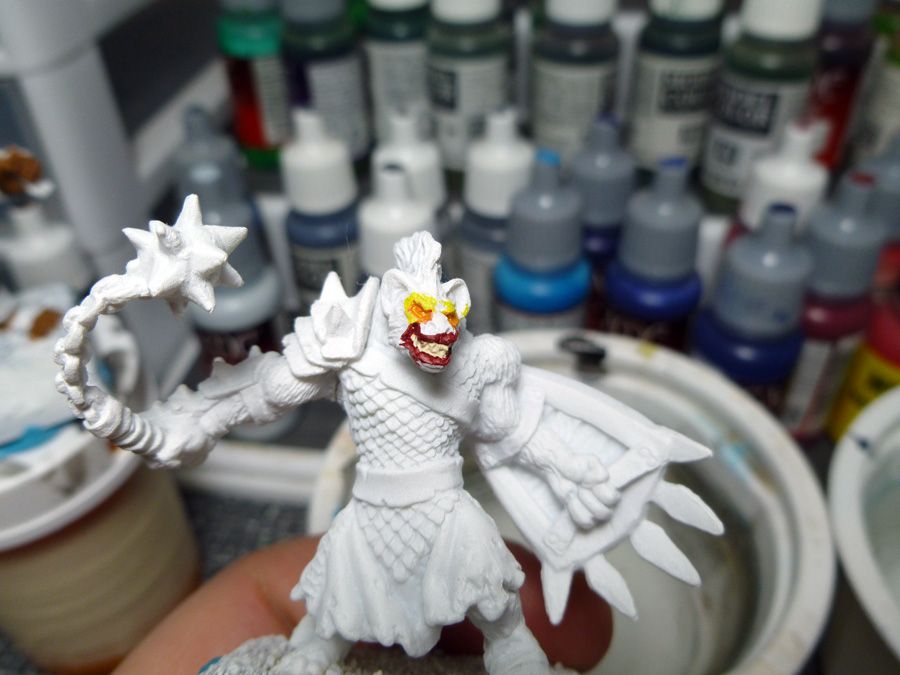
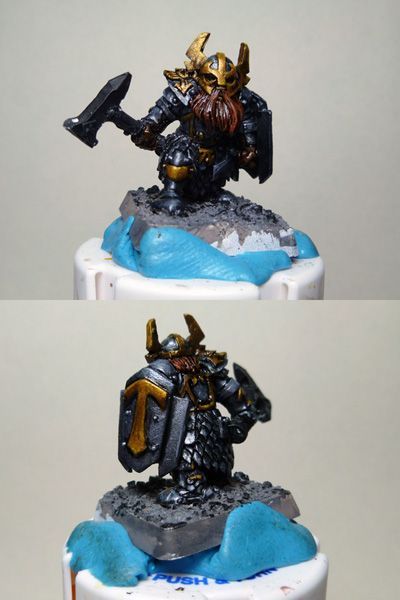
Speaking of which, one of my players will be running a dwarven Runeforger (think armored mage who, instead of casting spells, can temporarily imbue his weapons and armor with spell-like effects.) This is my work-in-progress for his miniature:
Everything is ready for me to finish my write-up, by the way, I just need to get my new campaign ready to run to clear my table. That includes miniatures for my PCs.
Speaking of which, one of my players will be running a dwarven Runeforger (think armored mage who, instead of casting spells, can temporarily imbue his weapons and armor with spell-like effects.) This is my work-in-progress for his miniature:
(˙pǝsɹǝʌǝɹ uǝǝq sɐɥ ʎʇıʌɐɹƃ ʃɐuosɹǝd ʎW)
-
TiLT
- Posts: 4435
- Joined: Sun Oct 17, 2004 7:01 am
- Location: Trondheim, Norway
- Contact:
Re: [Miniatures] Painting tips and progress reports (with pi
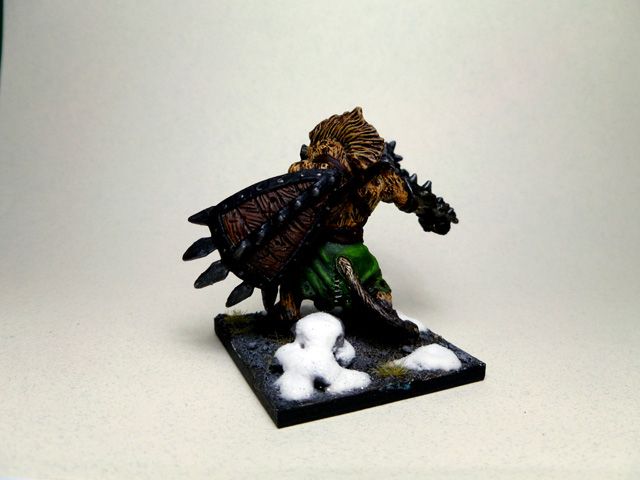
Another mini done, this time the troll from Reaper Bones. It was a great opportunity for me to experiment with shading and lighting. There's a lot more effort that went into this than what is apparent in the pictures, and it looks better in front of me than it does in the pictures. While I probably used about 6 or so different shades of green, it's not really that easy to see in the picture since the brightest shades contrast too harshly with the rest. I should probably have thinned the paint a bit more, and I probably need better lighting where I paint so that I can see what I'm doing.
Nevertheless, I think it turned out fine.


Nevertheless, I think it turned out fine.
Insert witty comment here.
-
hepcat

- Posts: 51884
- Joined: Wed Oct 13, 2004 3:02 pm
- Location: Chicago, IL Home of the triple homicide!
Re: [Miniatures] Painting tips and progress reports (with pi
Whoa, nice! 
I'm going to dip my toe into the waters of Malifaux after reading through the rules a bit more. I really like what it does and it doesn't seem that expensive to start. Hopefully it doesn't become like AE-WW2 and Secrets of the Third Reich where I buy a small set to try it out and then just get discouraged because I don't have everything right away to start playing. With Malifaux it looks like I can start playing with a very small amount of figs and very few accessories.
I'm going to dip my toe into the waters of Malifaux after reading through the rules a bit more. I really like what it does and it doesn't seem that expensive to start. Hopefully it doesn't become like AE-WW2 and Secrets of the Third Reich where I buy a small set to try it out and then just get discouraged because I don't have everything right away to start playing. With Malifaux it looks like I can start playing with a very small amount of figs and very few accessories.
He won. Period.
-
Blackhawk
- Posts: 44293
- Joined: Tue Oct 12, 2004 9:48 pm
- Location: Southwest Indiana
Re: [Miniatures] Painting tips and progress reports (with pi
Great job. You've really got the idea on manual highlighting. On the sharp contrast on the highlights, thinning would probably solve that, yes. On something of that size, though, I'd consider a final green glaze over the whole figure to pull the shades together.
(˙pǝsɹǝʌǝɹ uǝǝq sɐɥ ʎʇıʌɐɹƃ ʃɐuosɹǝd ʎW)
-
wonderpug

- Posts: 10346
- Joined: Tue Oct 19, 2004 4:38 pm
- Location: Albuquerque, NM
Re: [Miniatures] Painting tips and progress reports (with pi
Can I get a step by step on how to get my Last Night on Earth zombies looking spiffier without a ton of effort? Techniques like dunking the whole miniature to do the shading? That's my style for this. I don't mind breaking out brushes to do a wee bit of finer work, though. Also, I may put a bit more effort into the minatures for the heroes than I do for the zombies.
My only experience with this kind of stuff is painting some larger plastic models when I was a kid. I did this poorly.
FWIW, I have access to a single-action airbrush and a few regular brushes. I'm happy to buy some more supplies, though.
My only experience with this kind of stuff is painting some larger plastic models when I was a kid. I did this poorly.
FWIW, I have access to a single-action airbrush and a few regular brushes. I'm happy to buy some more supplies, though.
-
Blackhawk
- Posts: 44293
- Joined: Tue Oct 12, 2004 9:48 pm
- Location: Southwest Indiana
Re: [Miniatures] Painting tips and progress reports (with pi
Dips are popular for that approach. I haven't used them myself, so I can't comment in detail, but I understand that they're great for a quick, low-effort paintjob. You simply lay down the basic colors, then dip the whole piece into a tub of goo, shake it off, and let it dry.
(˙pǝsɹǝʌǝɹ uǝǝq sɐɥ ʎʇıʌɐɹƃ ʃɐuosɹǝd ʎW)
-
coopasonic
- Posts: 21011
- Joined: Fri Mar 04, 2005 11:43 pm
- Location: Dallas-ish
Re: [Miniatures] Painting tips and progress reports (with pi
Be careful. That sounds suspiciously like the process that ended up with my becoming a father.Blackhawk wrote:Dips are popular for that approach. I haven't used them myself, so I can't comment in detail, but I understand that they're great for a quick, low-effort paintjob. You simply lay down the basic colors, then dip the whole piece into a tub of goo, shake it off, and let it dry.
-Coop
Black Lives Matter
Black Lives Matter
-
TiLT
- Posts: 4435
- Joined: Sun Oct 17, 2004 7:01 am
- Location: Trondheim, Norway
- Contact:
Re: [Miniatures] Painting tips and progress reports (with pi
I'm on a roll! I just finished a small band of battle-hardened Chaos Warriors from Warhammer Fantasy Battle, though I'm going to use them for my next Warhammer Fantasy Roleplay 2nd Edition campaign. 
This turned out pretty well. There's always the odd little detail that sticks out when you see these pictures up close, but it works! They look like they've seen their fair share of battles.


This turned out pretty well. There's always the odd little detail that sticks out when you see these pictures up close, but it works! They look like they've seen their fair share of battles.
Insert witty comment here.
-
TiLT
- Posts: 4435
- Joined: Sun Oct 17, 2004 7:01 am
- Location: Trondheim, Norway
- Contact:
Re: [Miniatures] Painting tips and progress reports (with pi
There's no "free" way to paint miniatures. At some point you'll need to get your hands dirty, so to speak.wonderpug wrote:Can I get a step by step on how to get my Last Night on Earth zombies looking spiffier without a ton of effort? Techniques like dunking the whole miniature to do the shading? That's my style for this. I don't mind breaking out brushes to do a wee bit of finer work, though. Also, I may put a bit more effort into the minatures for the heroes than I do for the zombies.
My only experience with this kind of stuff is painting some larger plastic models when I was a kid. I did this poorly.
FWIW, I have access to a single-action airbrush and a few regular brushes. I'm happy to buy some more supplies, though.
The easiest way that I know of to paint a miniature is this:
- Spray prime it in the primary color that the final miniature will have. This requires that you buy one spray can for each color you'll need.
- Dunk it in Quickshade, or preferably splash the stuff on the mini with a brush. The latter doesn't take much more time than the former, and gives better results.
You'll won't exactly get any impressive results this way, but it's as easy as it gets. If you want something that looks decent while spending as little time as possible, look at the zombies I painted earlier in this thread for how to do that. This requires that you actually paint the miniature in its primary colors, and this is what's going to be the most work.
The gnoll, troll and chaos warriors I've posted in this thread don't use Quickshade at all, btw. Their process went something like this:
- Spray priming (white or black)
- Paint the mini using a brush. Flat colors only at this stage, and I prefer to start with dark colors for the most part, unless I really want a color to stick out. Expect to paint in two or three layers before the colors look good.
- Shade the mini. The quickest way is to paint with something like Citadel Shade in the colors you want to pronounce.
- Paint highlights. This typically involves (for me) 3-6 different shades of the color you want to highlight, with each successively brighter shade being painted on a smaller area. Look at the troll mini to see this effect in action, though I've used it for all the minis I recently painted.
- Dry brush those areas that would benefit from it. This meant fur and metal in my paint attempts. This is highlighting for materials that need to look a bit more dirty and chaotic than regular highlighting would offer.
- Paint details, such as eyes, teeth, insignias, etc. You may want to add a dash of shade and some highlighting to these too, but it's often not necessary.
- Base it. Use PVA glue, a sculpting tool, and suitable basing materials. Don't add any grass just yet.
- Varnish the mini. I merely used a quick spray of matte varnish for these, but I'll probably do a coat of gloss varnish followed by matte varnish for others, as it protects them better.
- Add grass to the base, if necessary.
As you can see, it gets pretty involved. You get more effective quickly though. It was amazing how much quicker it was to paint the chaos warriors (all three at once!) than it was painting the gnoll.
I wouldn't use the airbrush just yet. From what I understand, it's best used for certain effects or types of minis. I watched a good tutorial on how to paint an awesome fire elemental with it, but this is advanced stuff. An airbrush is on my wishlist, but I don't really need it yet.
Insert witty comment here.
-
Boudreaux
- Posts: 2816
- Joined: Fri Oct 15, 2004 12:18 am
- Location: St. Louis
Re: [Miniatures] Painting tips and progress reports (with pi
TiLT's method is pretty elaborate. You can get pretty decent results with just the following steps:
- Spray priming (white or black)
- Paint the mini using a brush.
- Shade the mini.
- Varnish the mini.
I painted my LNoE minis using this method and they turned out pretty well. Give them a coat of primer, then brush paint the minis with basic colors. Don't worry about adding shading or highlights at this point.
Once the minis are painted, the step that will make the most difference is shading with a neutral dip or wash. For the dip method I've heard a lot of people recommend wood stain, but it's oil-based and messy. I prefer using a pre-made wash like the Citadel Washes, particularly the Devlan Mud shade - which is just basic brown. You basically brush the wash all over the mini, letting it settle in the recesses and pits to add shading and bring out detail. It's a poor man's painting method, but it works and is simple. This site gives a good overview of the Citadel washes with some before/after photos.
Last step - add a spray matte clear coat finish.
-
Blackhawk
- Posts: 44293
- Joined: Tue Oct 12, 2004 9:48 pm
- Location: Southwest Indiana
Re: [Miniatures] Painting tips and progress reports (with pi
My methods aren't actually all that much more complicated than TiLT's list there. The only reason they're so long is that I went into a lot of detail on the steps, but they still follow that basic list (with a few things different for each painter.)
(˙pǝsɹǝʌǝɹ uǝǝq sɐɥ ʎʇıʌɐɹƃ ʃɐuosɹǝd ʎW)
-
TiLT
- Posts: 4435
- Joined: Sun Oct 17, 2004 7:01 am
- Location: Trondheim, Norway
- Contact:
Re: [Miniatures] Painting tips and progress reports (with pi
Just be aware that the Citadel Wash range has been discontinued and replaced with Citadel Shade, which is what I've been using in all my recent minis. They are very close, but behave slightly differently. Shade is brilliant, and can be pretty subtle. Just look at the fur on my gnoll, which I shaded with a yellow (actually red, because that's how yellow tends to look when shaded) Citadel Shade. The overall effect isn't dramatic, but enhances the realism of the final model. Keep in mind that the Citadel Shades are meant to be used along with a highlighting pass or two.Boudreaux wrote:This site gives a good overview of the Citadel washes with some before/after photos.
Insert witty comment here.
-
wonderpug
- Posts: 10346
- Joined: Tue Oct 19, 2004 4:38 pm
- Location: Albuquerque, NM
Re: [Miniatures] Painting tips and progress reports (with pi
Appreciate all the input. Looking forward to giving things a spin.
-
TiLT
- Posts: 4435
- Joined: Sun Oct 17, 2004 7:01 am
- Location: Trondheim, Norway
- Contact:
Re: [Miniatures] Painting tips and progress reports (with pi
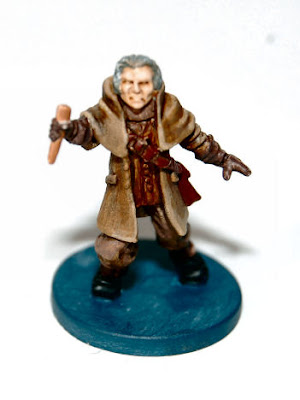
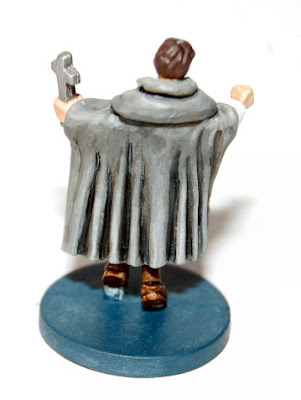
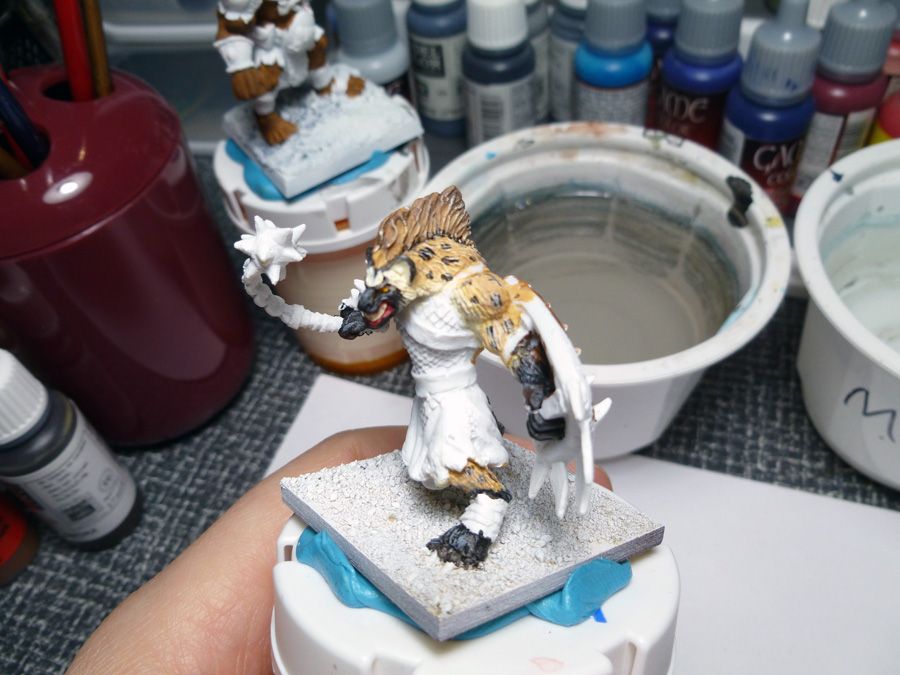
With all this talk of shading and highlighting, I thought I'd document the effects of both on my latest miniature, which I just finished. This time it's a suitably low-fantasy hero character, which I'm hopefully going to be able to use for my upcoming Warhammer campaign.
The first picture (it's a bit blurry. Sorry about that) shows the mini after the basecoat. Keep in mind that I don't do anything about the base until the rest of the mini is done since I like to hold it while working. Notice how flat and dull the mini looks at this point.

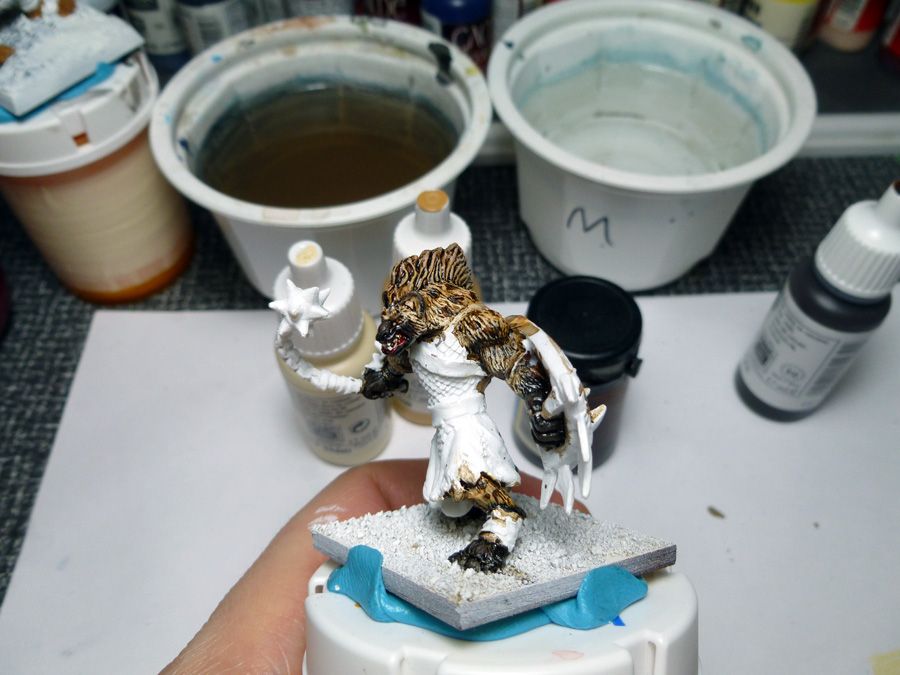
Here's the same mini after a quick pass of shading. This is the easiest part of painting a miniature, but you can tell it makes a lot of difference. I used three different colors of Citadel Shade here: One for green, one for brown, and one for skin.

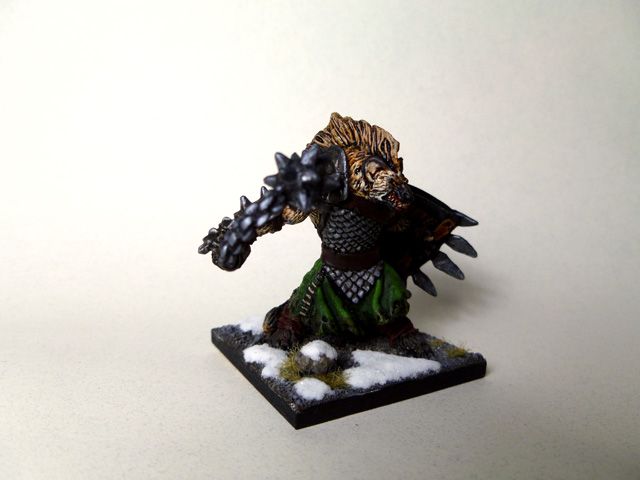
And finally, the mini after the highlighting and basing. Compare this to the basecoated version and see just how massive the difference is. Basecoating takes a lot more time than shading and highlighting does, so the extra work is absolutely worth it.


It's a bit embarrassing to post closeups of my minis from this angle, as mistakes are very obvious this way. I keep noticing problems after I take these pictures, such as paint that got where it shouldn't, spots where the primer is still visible, and so on. No matter though, for these mistakes are extremely hard to see when you're not looking at the picture, but instead at the real thing.
This particular mini was very tricky, btw. Lots of small details that had to be handpainted to look good, its size was smaller than any of the others I've recently painted, and there were plenty of similar colors that I still had to make look different somehow. There were few shortcuts I could take here, so this was a test of patience.
The first picture (it's a bit blurry. Sorry about that) shows the mini after the basecoat. Keep in mind that I don't do anything about the base until the rest of the mini is done since I like to hold it while working. Notice how flat and dull the mini looks at this point.
Here's the same mini after a quick pass of shading. This is the easiest part of painting a miniature, but you can tell it makes a lot of difference.
And finally, the mini after the highlighting and basing. Compare this to the basecoated version and see just how massive the difference is. Basecoating takes a lot more time than shading and highlighting does, so the extra work is absolutely worth it.
It's a bit embarrassing to post closeups of my minis from this angle, as mistakes are very obvious this way. I keep noticing problems after I take these pictures, such as paint that got where it shouldn't, spots where the primer is still visible, and so on. No matter though, for these mistakes are extremely hard to see when you're not looking at the picture, but instead at the real thing.
This particular mini was very tricky, btw. Lots of small details that had to be handpainted to look good, its size was smaller than any of the others I've recently painted, and there were plenty of similar colors that I still had to make look different somehow. There were few shortcuts I could take here, so this was a test of patience.
Insert witty comment here.